Peak District’s Best Lakes for Photos: Scenic Walks and Viewpoints
Peak District’s Best Lakes for Photos: Scenic Walks and Viewpoints
Lakes and reservoirs in the Peak District are built for the lens: calm water doubles skies for mirror‑like reflections, gritstone edges frame sweeping backdrops, and dams and bridges offer bold leading lines. This guide pinpoints the most photogenic spots—plus short, waymarked circular walks (typically 1–3 hours) that pair scenic viewpoints with safe footing. Dawn starts help with glassy water and easier parking, and changeable weather means layers are essential. Our picks and methods mirror how travel roundups weigh scenery, access, and amenities, often blending expert nominations with reader votes to decide “best” lakes USA Today’s Best Lake awards.
Golden hour is the first hour after sunrise and the last hour before sunset, when the sun sits low and the light turns warm and directional. Shadows soften, contrast drops, and color deepens across sky and water—ideal conditions for mirror‑calm reflections and lake photography.
Hiking Manual
At Hiking Manual, we lead with safety and clarity. Expect routes that favor grippy footwear on wet stone, traction and guardrails on dam paths, and realistic turn‑around points if weather flips. Reservoir edges, spillways, and outflows can be treacherous—our guidance keeps you behind barriers and on signed paths. We write for beginner to intermediate hikers, family groups, and photo‑curious walkers who want dependable, well‑waymarked routes with standout viewpoints, not risky scrambles. For dawn/dusk and shoulder seasons, we lean winter‑ready: wet‑grip shoes or boots, high‑loft fleece, and a weatherproof parka go a long way when temperatures dip before sunrise. Use the lake sections below and the quick‑plan tables to choose a safe, photogenic circuit fast.
For local planning and car park details, start with Peak District National Park’s planning guidance, which centralizes visitor information, safety, and parking updates.
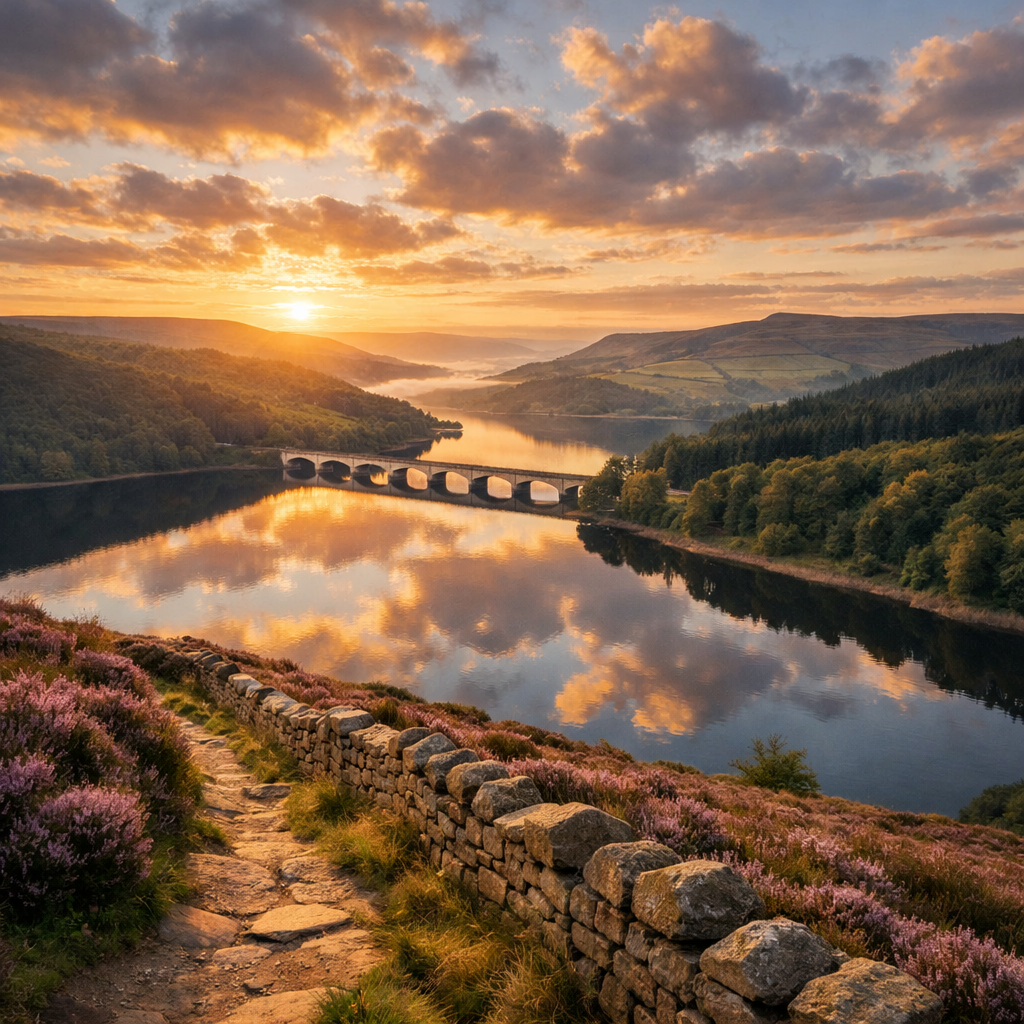
Ladybower Reservoir
Few places shout Peak District like Ladybower: still water, Ashopton Viaduct symmetry, and the famous circular “plugholes” when the overflows run. For a flexible 1.5–3 hour circuit, combine shoreline paths near the viaduct with a spur to the dam for stepped‑wall textures and long views down the Upper Derwent Valley. Hiking Manual’s suggested loop links signed shoreline paths with official viewpoints to keep things simple and safe.
- Best viewpoints: Frame Ashopton Viaduct from both shores for clean arches and reflections; use shoreline trees and stones as foreground anchors; if the plugholes are active after wet spells, compose from officially designated viewpoints only.
- Photo guidance: Arrive pre‑dawn for the most glassy water. A wide‑angle lens emphasizes viaduct symmetry; a mid‑tele compresses tree‑lined banks and ridge layers. Pack neutral density filters for long‑exposure shots of spillways and outflows to smooth water and cloud motion.
- Safety/access: Expect paid/limited spaces at popular car parks, especially around Fairholmes; arrive early and keep a backup lay‑by in mind. Respect all barriers near dam structures.
Neutral density (ND) filter: A darkened filter that reduces light without changing color, allowing slower shutter speeds in daylight. It’s essential for creating silky water on spillways and outflows during long exposures.
For context on amenities and history across the Upper Derwent Valley, see the regional visitor information.
Howden Reservoir
North of Derwent lies moodier Howden, with stone bridges, tree‑lined inlets, and a more remote feel that shines on overcast days. Stitch together a 2–3 hour out‑and‑back or loop using forest tracks to alternate tight woodland scenes with open water. Hiking Manual’s route notes favor forest tracks for dependable footing and well‑timed photo stops.
- Viewpoints: Use the stone bridge parapets as strong leading lines; tuck low along inlets for layered reflections; shoot up‑valley from the shore to align water, forest, and skyline.
- Photo guidance: Overcast is your ally for textured black‑and‑white; spare use of a circular polarizer preserves reflections. Compose along paths and parapets for depth and direction.
- Safety/access: Fewer amenities than Ladybower—carry extra layers and rain protection. Fine weekends can still bring crowds; go early or aim for late light.
Derwent Reservoir
Derwent is the crowd‑pleasing middle sibling: easy access, family‑friendly banks, and calm coves that reward reflection hunting. It also offers classic gritstone‑framed woodland scenes and views toward the historic Derwent Dam—famous for wartime “Dambusters” training—when access is open. Hiking Manual keeps the circuit family‑friendly with clear turnaround options if conditions change.
- Viewpoints: Tree tunnels along the eastern shore, dam‑crest perspectives where permitted, and sheltered coves on still mornings.
- Photo guidance: Use a foreground anchor (boulder, post, or overhanging branch) and shoot low to exaggerate reflections. A graduated ND helps balance bright skies at sunrise.
- Safety/access: Heed no‑swimming signs and keep distance from edges and spillways. Car parks can pinch; off‑peak or early visits are smoother.
Dovestones Reservoir
On the Peak District’s western edge, Dovestones pairs accessible paths with sweeping moorland backdrops—ideal for first‑time lake photographers and families. Plan a 60–90 minute loop with an optional spur onto the moor for light elevation and wide views. Hiking Manual’s loop sticks to accessible paths with a simple moor spur for confident walkers.
- Viewpoints: Moorland ridgelines as mid‑ground, shoreline reeds and rocks as foreground, plus spillway textures after rain.
- Photo guidance: Golden hour side‑light sculpts the moors. Bracket exposures to handle contrast between bright sky and dark slopes. Use a circular polarizer lightly to tame glare without killing reflections.
- Safety/access: Wind rises quickly off open moor—bring a windproof layer and stable, wet‑grip footwear.
For broader moorland access tips and conservation etiquette across Peak landscapes, see the National Trust’s Peak District hub.
Torside Reservoir
Torside delivers industrial‑heritage textures—stonework, spillways, embankments—and a long, linear water body perfect for panoramas and long‑exposure studies. Link multiple angles on a 60–120 minute shoreline walk. Hiking Manual connects straightforward shoreline paths for multiple angles without straying near infrastructure.
- Viewpoints: Spillway cascades after wet weather, stone embankments with repeating patterns, and pylons or rail remnants as graphic counterpoints.
- Photo guidance: ND filters create silky spillways; stitch panoramas along the reservoir’s long axis to emphasize scale. A mid‑tele isolates stone textures and rhythm in the walls.
- Safety/access: Keep distance from fast‑moving water and fenced areas; stick to official paths. Parking varies by lay‑by and car park—check on arrival.
Longdendale Chain
Think of Longdendale as a photo corridor you can sample in segments: work northeast to southwest (or reverse) from Woodhead through Torside to Rhodeswood, topping up with Valehouse and Bottoms if time allows. Build a coherent series: start with wide establishing frames, add sluice and stone details, then layer moody ridges.
- Tip: Choose two short stops rather than sprinting the whole chain; good light beats more miles.
Reservoir-by-reservoir snapshot:
| Reservoir | Best light | Time on foot | Standout subject |
|---|---|---|---|
| Woodhead | Sunrise side‑light on moors | 45–90 min | Stone spillway and long ridge lines |
| Torside | Blue hour to mid‑morning for mist | 60–120 min | Cascading spillways, embankment patterns |
| Rhodeswood | Late afternoon | 45–90 min | Woodland edges, sluice detail |
| Valehouse | Soft overcast | 30–60 min | Calm coves, reed beds |
| Bottoms | Sunset color | 30–60 min | Stonework with village context |
Bonus picks nearby
- Langsett Reservoir (60–90 min loop): Pine‑framed reflections with gritstone edges; watch for seasonal bird‑protection zones. Dawn visits are quieter.
- Errwood Reservoir, Goyt Valley (60–120 min): Rolling hills and arched bridges; autumn color excels.
- Carsington Water (90–150 min): Broad vistas, bird hides, and big‑sky reflections; verify seasonal car park changes.
Always confirm parking and any restrictions via local council or park pages before you go.
How to photograph Peak District lakes safely
- Footwear: Prioritize wet‑grip traction on stone and mud. In shoulder or winter seasons, add microspikes and gaiters for icy paths and slush.
- Positioning: Stay well back from dam edges and spillways; fences and signs exist for a reason. If shooting pre‑dawn, work with a buddy or share your live location.
- Weather: Pack a high‑loft fleece and waterproof shell, plus headlamp, map/app, and backup power. Note that overcast can be creatively advantageous for moody, texture‑rich images.
Local water companies and land managers consistently advise against swimming in reservoirs due to cold‑water shock, hidden currents, and infrastructure; see Yorkshire Water’s reservoir visits page for typical safety guidance.
Gear checklist for lake photography walks
- Camera body with weather‑resistance or rain cover
- Wide‑angle zoom (e.g., 16–35mm) for sweeping shores and viaducts
- Mid‑tele (70–200mm) for compressed edges and ridge layers
- Tripod with spiked or interchangeable feet for soft ground
- ND filters (3–10 stop) for long exposures
- Circular polarizer (use sparingly to preserve reflections)
- Graduated ND for bright skies at sunrise/sunset
- Waterproof shell, insulating fleece, hat, gloves
- Grippy footwear; in winter, add microspikes and a warm parka
- Headlamp, first‑aid mini‑kit, 1–2L water, snacks, power bank
Planning your route and access
- Route flow: Pair Ladybower at sunrise with Derwent mid‑morning; or scout Longdendale midday and finish at Torside for golden hour. Quality over quantity—two lakes per day is realistic.
- Time and light: Target golden hour for reflections; use midday for high‑contrast textures or black‑and‑white studies. Most scenic circuits are 1–3 hours—ideal half‑day windows with photo stops.
- Parking/permits: Popular car parks are often limited or paid—arrive early and carry cash/card. Watch for no‑swimming, drone, or path‑closure signage.
Quick‑plan table:
| Lake | Main car park (example) | Typical loop length | Facilities |
|---|---|---|---|
| Ladybower | Fairholmes area | 1.5–3 hrs | Toilets (seasonal), kiosks nearby |
| Howden | Upper Derwent access points | 2–3 hrs | Limited; carry layers/food |
| Derwent | Shoreline car parks | 1–2 hrs | Family‑friendly segments |
| Dovestones | Main reservoir car park | 1–1.5 hrs | Toilets; café nearby |
| Torside | Torside car park/lay‑bys | 1–2 hrs | Basic; check signage |
Long exposure uses intentionally slow shutter speeds to blur motion—smoothing water, softening cloud streaks, and turning spillways silky. You’ll need a stable tripod and often an ND filter to avoid overexposure. The result is a calm, minimalist aesthetic that flatters reservoirs and dams.
Context: Travel features that rank “best lakes” typically emphasize scenery, reflections, and accessible recreation, often combining expert input with reader voting USA Today’s Best Lake awards. As an aside you might see in such media, Crater Lake is commonly cited as the deepest lake in the United States at roughly 1,943 feet, underscoring how lists mix beauty with superlatives Travel + Leisure.
Frequently asked questions
What time of day gives the best reflections at Peak District reservoirs?
Early morning during golden hour usually gives the calmest water and soft, directional light for clean reflections; Hiking Manual plans most circuits to hit these windows.
Are there easy, family-friendly lake circuits with good viewpoints?
Yes—Derwent and Ladybower have well‑marked loops with multiple shore viewpoints; Hiking Manual’s lake sections outline 60–120 minute options with simple add‑on spurs.
Can you swim in Peak District reservoirs?
No—swimming is typically prohibited for safety and water‑quality reasons; Hiking Manual keeps routes to signed paths away from water access points.
What lenses and filters work best for dams and spillways?
Use a wide‑angle for big scenes and a mid‑tele to isolate textures; Hiking Manual recommends a 3–10 stop ND for smoothing spillways and a light touch with a polarizer.
How many lakes can I realistically photograph in one day?
Two is realistic if you want good light and unhurried compositions; Hiking Manual suggests one at sunrise and one late afternoon with 1–3 hour walks between.