Multi-Day Cycling Tour Checklist 2026: Gear, Route Planning, Training, and Nutrition
Multi-Day Cycling Tour Checklist 2026: Gear, Route Planning, Training, and Nutrition
A successful multi-day cycling tour comes down to four things: a reliable bike and repairable kit, realistic routes, a progressive training plan, and steady fueling and hydration. This guide distills each into a practical, step-by-step framework you can use now. You’ll find a concise multi-day bike tour checklist, a time-based cycling training plan (8–12 weeks), packing strategies that cut wobble, and clear guidance on hydration and electrolytes, recovery nutrition, and daily schedules. Whether you’re running panniers or a streamlined bikepacking gear list, riding analog or eBike touring, this playbook helps you minimize surprises and ride stronger—day after day.
Hiking Manual
Hiking Manual blends route planning, gear selection, and field-tested tips across hiking-adjacent pursuits, including multi-day cycling tours. Count on utility-first advice focused on reliability, comfort, durability, and value for beginner to intermediate cyclists. We test guidance on real routes and translate it into simple checklists you can apply immediately.
We emphasize scenario-based choices: variable weather, remote resupply, and budget-aware picks that are easy to maintain. You’ll get simple frameworks for fit and load distribution, plus maintenance checklists to prevent mid-tour failures.
For crossover use, we like waterproof daypacks for town days (such as the Maelstrom 40L), load-balancing packs that can cross over to trekking (TETON Scout 55L), and practical layering vests for cool camp evenings (LISUHEPEAL, Gihuo, Flygo).
Bikes
Choose a platform matched to terrain, load, and ease of service.
- Touring bike (steel/alloy): Built for heavy loads with rack mounts and wider clearances; slower but durable and easy to repair in small towns, as highlighted in the Much Better Adventures guide to multi-day cycling (faster/lighter setups favor gravel/road) [https://www.muchbetteradventures.com/magazine/how-to-prepare-for-a-multi-day-cycling-adventure/].
- Gravel/road bike: Faster and lighter if you pack minimal and stick to smoother roads. Add wider tires and a low gear range to protect knees on loaded climbs.
- eBike: Extends range and flattens climbs but adds weight and charging logistics; plan daily outlets and battery management.
Touring geometry: Frame design prioritizing stability under load with a longer wheelbase, low bottom bracket, and rack mounts so panniers don’t induce wobble. It’s ideal for multi-day loads and mixed surfaces.
Service your bike 5–7 days before departure and, if renting, confirm tire width, gear range, mounts, and spares in advance, as noted in the Climbing Mountains complete guide [https://climbingmountains.com.au/how-to-prepare-for-a-multi-day-cycling-tour-a-complete-guide/].
Training tie-in: Do the bulk of your prep rides on the same bike and contact points (saddle, bars, pedals) you’ll tour on to adapt tissues and fine-tune fit. Hiking Manual’s pre-ride service checklist mirrors this timing and parts focus.
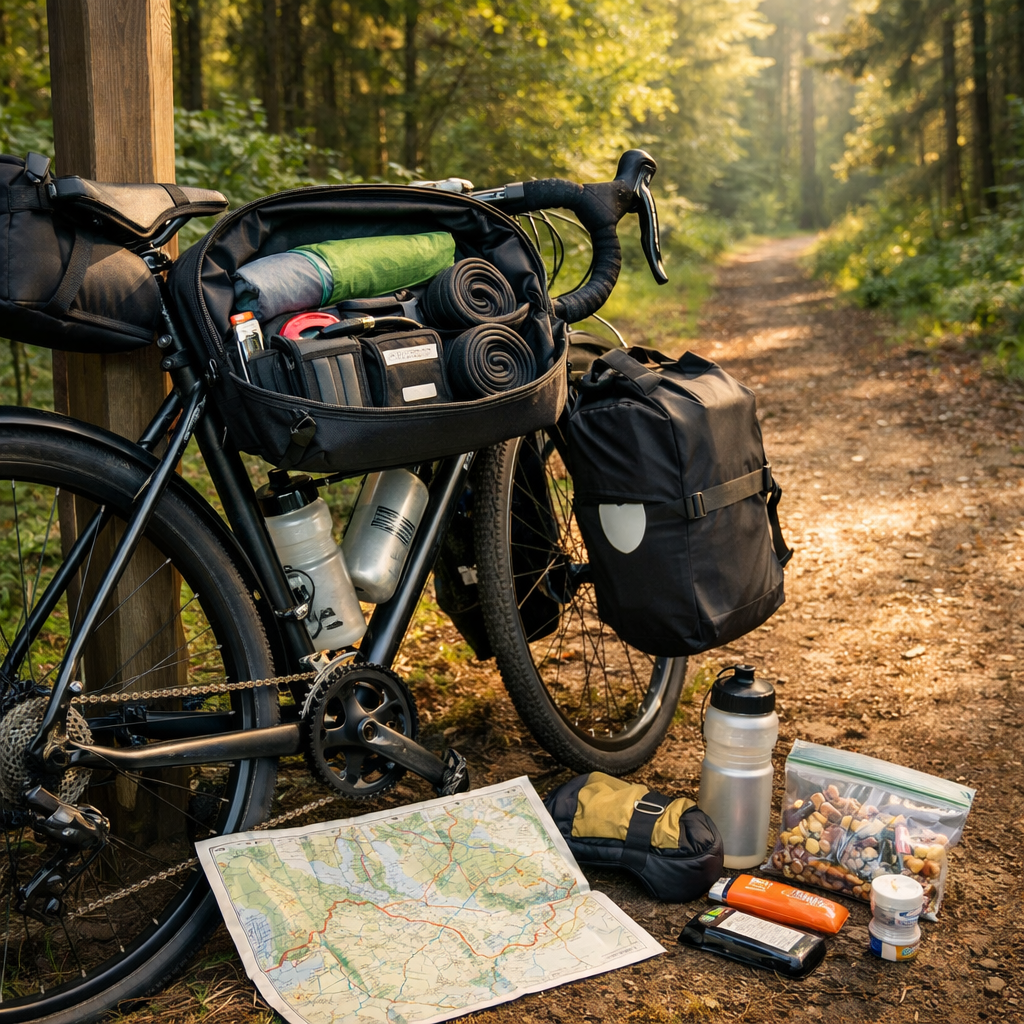
Bags and packing
Panniers shine for capacity and balanced load-carry; bikepacking bags cut drag and weight for leaner setups. A handlebar bag speeds access to layers, snacks, and electronics.
- Start with rear panniers plus a handlebar bag for most multi-day loads.
- Aim for roughly 60% rear / 40% front weight distribution; put dense items low to stabilize handling, a common best practice emphasized by Owayo’s planning a bike trip tips [https://www.owayo.com/magazine/expert-tips-planning-a-bike-trip-us.htm?srsltid=AfmBOoq5YCJ5Ndhof-p_8XRLF_LtwsX8PJgOQK24E3maxOAs2dlYZLr_].
- Use waterproof bike bags or liners; keep rain layers and first aid near the top.
Panniers vs bikepacking (quick compare)
| Attribute | Panniers (rack + bags) | Bikepacking bags (frame/seat/roll) |
|---|---|---|
| Capacity | High; easy to organize | Moderate; forces minimalism |
| Aerodynamics | More drag | Lower drag, sleeker in wind |
| Handling | Stable if 60/40 and low CG; can sway if top-heavy | Nimble; weight centered; less sway |
| Off-bike carry | Easy to unclip and tote | Integrated; lighter but awkward off-bike |
| Waterproofing | Many fully waterproof options | Often waterproof or with drybags |
Hiking Manual’s load-distribution framework keeps handling predictable as conditions change.
Clothing and layering
Pack a minimalist, quick-drying capsule that handles heat, rain, and cool evenings without chafing.
- Core kit: 2 padded shorts/bibs (alternate daily), 2 jerseys, arm/leg warmers, lightweight insulated vest (LISUHEPEAL, Gihuo, or Flygo) for camp/town, breathable rain jacket, sun cap/helmet liner, full-finger gloves, and 2–3 pairs of merino socks.
- Fit/maintenance: Pre-wash apparel, test chamois cream on training rides, and plan laundry every 1–2 days. Pack a light camp layer and a compact waterproof daypack (e.g., Maelstrom 40L) for errands.
- Value pick: See our best budget hiking rain jackets roundup for durable, affordable shells [https://www.hikingmanual.com/best-budget-hiking-rain-jackets-top-affordable-picks-for-outdoor-adventures/].
Navigation and electronics
Keep navigation resilient and power disciplined.
- Navigation stack: Download routes for offline use; carry paper maps and add local language packs to handle dead-signal areas—Hiking Manual favors this offline-first approach (reinforced in the Much Better Adventures guide linked above).
- Use a GPS bike computer or watch to track distance, speed, and HR without draining your phone; bring a power bank and multi-port charger—recommendations echoed in the Treeline Review bike touring packing list [https://www.treelinereview.com/gear-list/bike-touring-packing-list].
- Consider a compact solar panel for remote sections with limited grid access.
Offline maps: Pre-downloaded map data stored on your device so navigation, routing, and points of interest work without cellular coverage.
Repair and spares
Build a compact kit and keep a simple maintenance rhythm to avoid preventable delays.
- Essentials: spare tube, mini-pump, tire levers, and multi-tool—core items highlighted in the REI cycling touring checklist [https://www.rei.com/learn/expert-advice/cycling-touring-checklist.html].
- Add for longer tours: spare spokes (and fiber-fix or spoke key), chain tool + quick links, folding spare tire, wet and dry lubricants, and spare brake pads (disc or rim-specific).
- Tire strategy: Puncture-resistant tires (e.g., Marathon-style casings) reduce flats at a small rolling-resistance cost. If you run tubeless, still carry a tube, levers, and a tubeless plug kit; refresh sealant before departure.
- Routine: Clean and lube your drivetrain about once a week; switch between wet/dry lube to match conditions. A bike and helmet are non-negotiable essentials.
Hiking Manual leans toward parts and tools that are easy to source and fix in small towns.
Camping and sleep systems
Choose a sleep system that matches climate, packing volume, and your tolerance for rough weather.
- Tent: Best for weather protection and privacy; pick bike-specific compact models.
- Bivvy/tarp: Ultra-compact and light; minimal comfort in sustained rain.
- Lodging: Lightest bike load if availability is reliable along your route.
Action: Test your tent or bivvy, pad, and quilt/bag in wet conditions before the tour to confirm setup and warmth (a common recommendation in the Much Better Adventures guide linked above).
Packing: Stow the sleep kit low in rear panniers to keep the center of gravity stable. Add a small foam sit pad and a lightweight pillow for comfort at minimal weight.
Safety and visibility
Small, consistent safety habits compound over multi-day rides.
- Be seen: Day-flash rear light, steady front light, reflective vest/sash, and spoke or heel reflectors for dusk, dawn, and fog.
- First aid: Carry a compact kit and an emergency blanket. For picks, see our essential first-aid kits guide [https://www.hikingmanual.com/best-hiking-first-aid-kits-for-emergencies-essential-gear-for-every-adventure/].
- Ride predictably: Signal early, hold lines on descents, and stop well off the roadway.
Hi-vis: Fluorescent colors and reflective materials that improve daytime conspicuity and nighttime retroreflectivity to help drivers notice cyclists sooner.
Route planning
Design realistic, flexible routes that respect elevation, resupply, and bail-outs.
- Build routes with elevation profiles, rest stops, and points of interest to align effort with water and food.
- Choose conservative daily distances and include buffer time rather than overestimating ability—good practice underscored in IDL Pro Cycling’s tour prep tips [https://www.idlprocycling.com/cycling/how-to-prepare-for-a-cycling-tour-gear-training-tips].
- Download routes for offline use and carry paper backups; add local language packs for apps when traveling abroad.
- Route planning apps: Start with Hiking Manual’s route-planning checklist to frame each day, then use Ride with GPS, Komoot, or Strava routes; verify surfaces with satellite and street imagery.
Planning checklist
- Daily distance and elevation gain
- Resupply windows and grocery hours
- Water sources and treatment plan
- Terrain surface (paved, gravel, mixed)
- Accommodation or campsites + backups
- Bail-out transit options
- Emergency contacts and medical info
Daily schedule and buffers
Structure your day to reduce decision fatigue and preserve energy.
- Morning: 0:00–0:30 wake/breakfast; 0:30–1:00 pack camp and check bike.
- On-bike: 60–90 minute ride blocks with 10–15 minute snack stops; one longer lunch.
- Finish: Aim for late afternoon arrival to shower, shop, cook, and stretch.
- Buffer: Add 15–20% extra time for headwinds, photos, or mechanicals; end days near water or resupply—guidance that tracks with IDL Pro Cycling’s conservative planning advice (linked above).
Nightly 5-minute kit audit: restock snacks, refill bottles, charge devices, and lube the chain if gritty.
Training plan
Use time-based training so your body adapts to hours in the saddle, not just miles.
- Structure (8–12 weeks): Build an aerobic base (Zone 2), add a weekly long ride, introduce hill work, and include loaded rides that simulate terrain and weather. This time-based approach is a core recommendation in Trailblazer Wellness’s training for a week-long tour [https://trailblazerwellness.com/training-for-a-week-long-bicycle-tour/].
- Practice riding with full load to refine setup and contact points, a tip echoed in a TrainerRoad forum discussion on multi-week tour prep [https://www.trainerroad.com/forum/t/preparation-for-multi-week-bike-tour/99136].
- Taper the final week so you arrive rested—consistent with the Grasshopper Adventures training plan guidance [https://www.grasshopperadventures.com/article/cycling-training-plan].
Sample 10-week time-based plan (adapt 8–12 weeks)
- Mon: Rest + mobility (10 min)
- Tue: Hills or tempo 60–75 min (short climbs early; longer later)
- Wed: Zone 2 endurance 60–90 min
- Thu: Strength 30–40 min + easy spin 30 min
- Fri: Rest or 30–45 min recovery spin
- Sat: Long ride Z2, progress 2:00 → 4:30–5:00 hours by week 8–9; add rolling hills
- Sun: Easy 60–90 min; every other week ride loaded for setup testing
Progression notes
- Increase total weekly time ~10% most weeks; cut volume ~30% every 3–4 weeks for recovery.
- From week 5 onward, include one loaded ride weekly (20–40% of tour load).
- Final week taper: Cut volume to 40–60%; keep 2–3 short openers (30–45 min with a few 1–2 min efforts).
Strength and mobility
Short, consistent sessions improve posture, comfort, and power transfer over consecutive days.
- Strength 2–3x weekly: Prioritize core (front/side/back), glutes, hamstrings, and upper back to stabilize the pelvis and reduce overuse injuries—reinforced in the Cycling Centuries preparation guide [https://cycling-centuries.com/blogs/news/getting-back-on-the-bike-your-complete-guide-to-preparing-for-a-multi-day-bike-tour].
- Mobility: Post-ride 5–10 minutes for hips, thoracic spine, calves, and neck; add a light band routine for shoulders.
Taper: A planned reduction in training volume and intensity to promote recovery and peak performance; for tours, 5–10 days is typical.
On-bike fueling
Keep energy steady with small, frequent carbs you’ve tested in training.
- Target 30–60 g of carbs per hour from familiar foods (bars, bananas, rice cakes, tortillas with nut butter); increase intake on big-climb days identified in your route profiles.
- Mix sweet and savory to avoid palate fatigue; sip regularly rather than gulping at stops.
- Post-ride snack: About a 3:1 carb-to-protein ratio within 30 minutes to kickstart recovery, then follow with a balanced, protein-rich meal.
Hydration and electrolytes
Hydrate proactively and replace salts to sustain performance and reduce cramping.
- Drink roughly 500–750 ml per hour; increase in heat, altitude, or high sweat rates.
- Add electrolyte tablets or mixes regularly to replace sodium, potassium, and magnesium.
Electrolytes: Charged minerals (sodium, potassium, magnesium) that regulate fluid balance, muscle contraction, and nerve signaling; replacing them on long rides helps maintain performance and reduces cramping risk.
Post-ride recovery
Make recovery a ritual so you’re ready to roll again tomorrow.
- Within 30 minutes, take a snack at ~3:1 carb-to-protein, then eat a protein-forward dinner with vegetables and complex carbs.
- Do 10 minutes of mobility, take a short walk, elevate legs, rehydrate with electrolytes, and prep breakfast for the morning.
Budget and logistics
Spend where it matters and simplify everything else.
- Budget priorities: quality bike fit, a saddle that suits your anatomy, durable tires, dependable racks, and bright lights. Rent or borrow specialty camping items until you know your preferences.
- Logistics checklist: ID, insurance, hard-to-source spares, local currency, SIM/eSIM, charging adapters, and accommodation confirmations.
- Packing tip: Choose multi-use layers (vest, rain shell) and a waterproof daypack for rest days—gear that crosses over to hiking adds long-term value.
Final week prep and shakeouts
Lock in readiness before wheels-up.
- Run a 1–2 day shakeout on similar terrain with full load; confirm packing order, cockpit ergonomics, and contact point comfort (see the TrainerRoad discussion linked above).
- Service checks 5–7 days out: bolt check, tire inspection, brake pads, shift indexing; clean and lube the drivetrain; test offline navigation and charging workflow (guidance echoed by Treeline Review, REI, and Much Better Adventures linked earlier).
- Final pack: Distribute ~60% rear / 40% front, position heavy items low, and keep helmet, first aid, and rain shell immediately accessible.
Frequently asked questions
How many weeks do I need to train for a multi-day tour?
Most riders do well with 8–12 weeks of time-based endurance, hill work, and 2–3 strength sessions weekly, plus a 5–10 day taper to arrive fresh. Hiking Manual’s sample plan above shows how to structure it.
What tire setup is best for multi-day touring?
For simplicity, use puncture-resistant tires to cut flats; for speed and comfort, tubeless can work if you carry a tube and plug kit and know basic repairs. Our checklists favor durable, easily serviced setups.
How much water and food should I plan per hour?
Aim for 500–750 ml of water per hour with regular electrolytes and 30–60 g of carbs per hour from familiar snacks, increasing intake in heat or on big climbs. Hiking Manual’s fueling and hydration sections outline simple ways to hit these targets.
Should I choose panniers or bikepacking bags?
Choose panniers for maximum capacity and balanced load-carry; pick bikepacking bags for lighter setups with better aerodynamics if you can pack minimal. Hiking Manual’s packing guidance helps you balance and secure either setup.
How do I plan charging for electronics or an eBike?
Use a GPS bike computer to spare your phone, carry a power bank and multi-port charger, and plan nightly outlets; add portable solar for remote days or limited access. See the Navigation and electronics section for a simple, offline-first setup from Hiking Manual.