How To Get Real-Time Bike Path Condition Alerts Nearby
How To Get Real-Time Bike Path Condition Alerts Nearby
Getting real-time bike path condition alerts nearby is simpler than it sounds: pair an on-bike warning device (for close passes and obstacles) with a routing app that ingests live incidents, closures, weather, and air quality, then enable mid-ride rerouting. This layered approach delivers immediate personal safety cues and proactive detours when conditions change. In this guide, we’ll walk you through choosing data sources, setting up sensors and apps, calibrating for winter, and sharing anonymized near‑miss data to improve local networks. As with all Hiking Manual advice, the focus is safety-first, cold‑weather readiness, and privacy-minded choices that fit a range of rider sizes and bikes.
What real-time bike path alerts can do
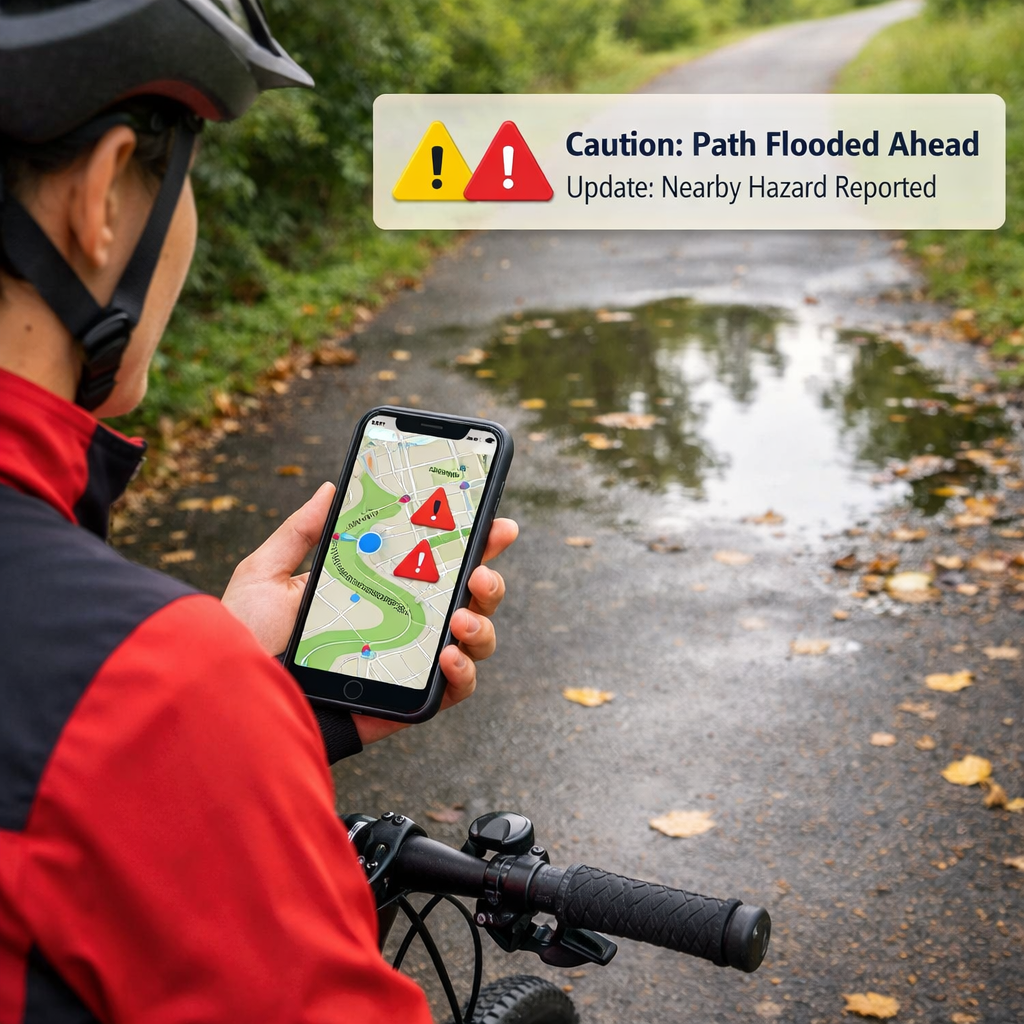
Real-time bike path alerts are a service or setup that detects immediate on-ride threats (like close passes or blocked paths) and fuses network data (traffic incidents, construction, and air quality) to warn riders and suggest safer routes as conditions evolve. The goal is low-latency warnings plus proactive, safe bike routing.
Examples you’ll actually use:
- On-bike detection flags a vehicle approaching too closely from behind and vibrates your bars.
- Corridor sensors report a lane closure ahead; your app proposes a detour before you reach the work zone.
- AQI and smoke advisories nudge you to a lower-exposure greenway during a wildfire event.
Low-latency incident and closure alerts at city scale are increasingly feasible via AI-driven traffic services that cover interstates, rural roads, and local streets, enabling reliable rerouting for cyclists as well as drivers (see the systemwide coverage described by INRIX’s AI Traffic AI-driven traffic services).
Step 1: Define your goals and riding area
Pick a primary outcome so your gear and apps match your rides:
- On-ride collision/hazard warnings for immediate personal safety.
- Safer routing and auto-reroutes as conditions shift.
- Contributing anonymized risk data to improve your local cycling network.
Hiking Manual’s bias is to write these down so setup decisions stay safety‑first and winter‑ready. Map your riding envelope—commute corridors, school runs, weekend paths—and mark winter variables: plow-priority streets, bridges that glaze over, shaded zones that hold black ice. When riders share aggregated, anonymized risk data, advocacy groups and agencies gain leverage to fix gaps and build safer networks, a loop the League of American Bicyclists has long encouraged to raise accountability in planning advocacy guidance.
Step 2: Choose your data sources
Blend at least two of these layers for redundancy: on-bike sensors for immediate, personal alerts, plus a network/API layer for rerouting. City corridor sensors are powerful where available. Hiking Manual’s default mix pairs on‑bike radar with a routing app that ingests live traffic and AQI—broad coverage without giving up control of your data.
Multimodal data fusion, in this context, means combining sensor inputs such as radar and video with contextual feeds like traffic incidents, construction, and air quality on a synchronized timeline. By time-aligning each stream to the same real-world moment, the system improves detection accuracy and the relevance of alerts.
Quick comparison to guide your mix:
- On-bike sensors: very low latency; personal coverage everywhere; hardware cost; excellent for hazard detection.
- City/corridor sensors: corridor-level coverage; moderate latency; requires local deployment; great for junction hotspots.
- Data/API feeds: citywide to regional coverage; variable latency; usually subscription/app-based; strong for live rerouting and exposure-aware choices.
On-bike sensors for immediate warnings
Bike-mounted devices give the fastest, rider-specific cues regardless of city coverage. A proven setup pairs a 77 GHz mmWave radar with a microcontroller, streams preliminary obstacle classes to your phone over Bluetooth, and time-syncs with an RGB camera (often via ROS) to stabilize detections across frames sensor fusion method. Typical performance includes roughly 100 m max range, about 0.49 m range resolution, and mismatched frame rates (e.g., 10 FPS radar vs. 25 FPS camera), which makes proper timestamping essential.
Complementary options include close-pass handlebar sensors that log within-four-feet events to your phone. In a two-month pilot with 15 cyclists over 240 rides, researchers recorded 2,050 close passes, and the data correlated with collision risk indicators—useful both for immediate rider awareness and for mapping persistent danger spots handlebar sensor pilot.
City and corridor sensors for network alerts
Intersection and corridor systems generate live detections that help riders anticipate conflict points. Hybrid video+radar platforms like Iteris’s Vantage Apex pair 1080p video with 4D/HD radar for detection up to approximately 600 feet and integrate SmartCycle algorithms to identify cyclists for signal timing and safety analytics intersection safety tech. For planning studies, Miovision Scout Plus uses onboard AI to produce pedestrian/bicycle insights aligned with the Safe System Approach, helping cities diagnose risky movements and prioritize fixes planning insights. Q‑Free systems distinguish cyclists, pedestrians, and even skateboarders, and can be solar powered for flexible deployment along trails or corridors corridor monitoring.
Check whether your DOT or MPO publishes live feeds or partners with bike-share operators to accelerate coverage. Pilots that pair on-bike sensing with corridor analytics have shown how public–private partnerships can scale impact and speed improvements pilot partnerships.
Data and API services for traffic, weather and air quality
Routing apps increasingly fuse third-party feeds to score safety dynamically and suggest detours. Integrate incidents, slowdowns, and closures through AI-driven traffic services with broad coverage and low-latency updates for rerouting that actually arrives in time traffic coverage and latency. For the UI, present alternatives labeled with safety, traffic, and air-quality indicators; incorporate time-of-day patterns and missing-infrastructure signals into live safety scores, an approach route-planning developers have used to make stop-minimizing and risk-aware choices more intuitive routing design approach. Layer AQI/pollution to estimate exposure per route and trigger smoke advisories when thresholds are crossed.
Step 3: Equip your setup and connect devices
- Mount sensors: rear radar centered and level; camera with unobstructed view; keep hardware out of wheel spray.
- Pair devices via Bluetooth in the vendor app; confirm firmware is current.
- Enable background permissions and notifications; verify GPS and motion permissions for live rerouting.
- If using radar+camera, turn on ROS or vendor SDK timestamping and confirm clock sync.
- Test in a low-traffic lot: verify distance cues and app reroute prompts.
Power planning for cold rides:
- Use a cold-rated power bank, short insulated cables, or a dynamo hub for long commutes.
- Stash electronics in a stem/frame bag to reduce wind chill; check glove clearance so buttons and haptics are reachable.
Troubleshooting pairing:
- Forget/re-pair devices; toggle Bluetooth LE scanning; close other fitness apps competing for sensor channels.
Step 4: Configure detection and alert logic
Create profiles (city commute vs. rural shoulder) that adapt detection ranges, warning tones, and reroute aggressiveness. Test at different speeds and densities. Keep alerts atomic: one hazard equals one cue—no stacking beeps for the same object. That aligns with Hiking Manual’s preference for concise, high-signal cues.
Filter, cluster and classify detections
Behind the scenes, most systems apply velocity filtering, then two-level clustering—first by similar velocities, then by consistent positions across frames—followed by feature extraction and coarse classification into vehicles, two-wheelers, and other objects fusion pipeline reference.
“Two-level clustering is a two-stage method that first groups radar points by similar velocity, then tracks those groups over time by position across frames. This stabilizes detections in traffic, enabling the system to follow moving objects and reduce spurious alerts from noise or brief occlusions.”
Recommended defaults you can tune:
| Filter type | Purpose | Recommended default | When to increase/decrease |
|---|---|---|---|
| Velocity filter | Remove stationary clutter | Ignore < 1–2 mph relative speed | Increase in dense city clutter; decrease on trails with slow bikes |
| Temporal smoothing | Stabilize jittery tracks | 200–300 ms window | Increase for rain/snow noise; decrease for high-speed rural riding |
| Confidence threshold | Suppress low-quality detections | Medium (balanced) | Increase to cut false positives; decrease to catch subtle threats |
| Occlusion timeout | Keep tracks alive through brief blocks | 0.5–1.0 s | Increase near parked cars; decrease to avoid ghost objects |
Set alert thresholds, audio cues and haptics
- Urban: shorter distance threshold, higher sensitivity; distinct tones for vehicles vs. bikes/peds based on coarse classification.
- Rural: longer look-ahead distance and speed-based escalation to avoid overload at 20–25 mph.
- Combine audio, LED, and haptic cues; for earbud-free riders in traffic, lean on bright, bar-mounted light patterns plus vibrations.
Calibrate for winter and low-visibility conditions
MmWave+video fusion remains robust in rain, snow, and darkness but demands careful timestamp alignment (10 FPS radar vs. 25 FPS camera) and steady power to maintain performance winter fusion considerations. Run cold-weather drills on salted roads and shaded bridges, check for lens fogging, and adjust mounts to avoid slush spray. This is core winter bike safety: reliable low-visibility detection beats speed. Cold‑weather reliability is a Hiking Manual non‑negotiable.
Step 5: Add contextual feeds for safer routing
Turn alerts into smarter choices before you encounter hazards:
- Enable traffic and construction layers for dynamic rerouting.
- Surface AQI and wind exposure on route cards.
- Mini-flow: scan alternatives → pick safer option → confirm voice guidance → keep mid-ride rerouting on.
Traffic incidents and construction zones
Use AI-driven feeds that flag incidents, slowdowns, and closures with broad coverage and low latency so detours arrive in time real-time traffic intelligence. Supplement with city sensor insights—platforms like Iteris and Miovision help reveal habitual choke points and risky turning phases at intersections intersection insights planning cameras.
Weather, wind and surface conditions
Integrate live wind and precipitation with your route profile. After storms, favor plowed arterials and exposed segments that dry faster. Quick pre-ride checks:
- Wind angle vs. route direction
- Temperature vs. freeze risk
- Recent snowfall vs. slush depth
Air quality and smoke advisories
Enable AQI overlays and show estimated exposure per route. Set a personal AQI threshold that triggers automatic detour prompts. Present route cards annotated with pollution levels so you can trade minutes for healthier air when needed exposure-aware routing.
Step 6: Test, pilot and share anonymized risk data
Run a 2–4 week pilot: log alerts, tag uncomfortable near-miss spots, and compare perceived risk before/after. Civic value scales when clubs, agencies, and health partners collaborate; shared findings add accountability and help implement safer plans, echoing long-standing advocacy best practices evidence for advocacy loops. Aggregated on-bike near-miss data also makes hidden dangers visible to officials, accelerating improvements through pilot partnerships and targeted fixes pilot collaboration example.
Battery, mounting and fit considerations for cold weather
- Power: choose cold-rated power banks; keep cables short/insulated; consider a dynamo hub for long commutes. MmWave+video fusion draws more power—size capacity accordingly power demand context.
- Mounting: place radar/cameras out of wheel spray and salt; angle lights to cut glare on sleet/fog nights.
- Fit: ensure you can reach buttons with bulky gloves; tall riders should verify bar/frame reach so haptics and LEDs remain within line of sight when layered up.
Privacy, consent and data governance basics
Data minimization means collecting only what’s strictly needed for alerts and routing, storing it briefly, and removing identifiers at the source. By reducing retained detail and linking, you lower breach risk, respect consent, and still enable useful, aggregated safety insights when paired with anonymization and opt-in sharing.
Provide clear toggles for sharing, visible retention windows, and on-device processing where feasible. When closing the loop with planners, share aggregated, anonymized summaries—not raw tracks—so communities benefit without exposing individual ride histories. That privacy-by-design stance is standard in Hiking Manual guides.
Budget trade-offs and what to prioritize first
- Start with an on-bike alert device or close-pass sensor for immediate, high-value safety.
- Add a routing app that integrates traffic and AQI next for live rerouting.
- Layer city data last, ideally via public portals or partnerships.
Trade-offs to know: handlebar pass sensors are affordable and effective for mapping near-misses but won’t see every obstacle near-miss mapping value. Infrastructure analytics strengthen coverage but can be costly or governance-heavy to deploy at scale city analytics considerations. Teaming with agencies or bike-share programs can reduce costs and speed deployment partnership path. Hiking Manual recommends starting small, then layering data as your needs grow.
Safety-first gear checklist for all-season riding
- Helmet with integrated rear light
- High-lumen front light (daytime visible)
- Reflective vest or sash
- Insulated, dexterous gloves (feel haptics)
- Grippy winter tires or studs
- Waterproof shoe covers and warm socks
- Cold-rated power bank and short cables
- Frame/stem bag to shield electronics
- Backup analog map in a zip bag
For tall riders, confirm reach and line of sight to displays with layered clothing. Choose optics that punch through sleet and fog. For more routing tips, see our overview of real-time trail conditions in the Hiking Manual real-time trail conditions guide Hiking Manual real-time trail conditions guide.
Frequently asked questions
What service provides real-time updates on local cycle path conditions
At Hiking Manual, we pair an on‑bike alert device with a routing app that ingests live traffic/incidents and air quality; that combo delivers timely local updates and safer reroutes.
Do I need both on-bike sensors and city data to get reliable alerts
Hiking Manual recommends on‑bike sensors for fast warnings plus traffic/AQI data for context; that combo covers most needs. City feeds add another layer when available.
How accurate are mmWave radar or camera-based bike alerts in rain or snow
Radar+camera fusion stays robust in low visibility if timestamps are synced and power is stable. Hiking Manual emphasizes those checks for reliable winter performance.
Will these alerts drain my phone battery on long rides
Continuous sensing and navigation are power-hungry, especially in cold. Hiking Manual advises a cold‑rated power bank, minimal screen time, and sheltered mounting to preserve runtime.
How can I share hazard reports without exposing my location history
Use apps with opt-in, anonymized, aggregated sharing and clear retention limits. Hiking Manual favors time‑limited summaries over raw tracks.