How to Choose a Low-Bulk Puffer That Layers Under Your Shell
How to Choose a Low-Bulk Puffer That Layers Under Your Shell
The best low-bulk puffer jacket for layering under a shell disappears when you’re moving, then delivers instant heat when you stop. To find it, match insulation to your climate, read warmth specs with a critical eye, and test the fit under your actual shell. Focus on practical details—fill power and fill weight, baffle construction, face-fabric denier, DWR, and compressibility—to get reliable warmth without restriction. Below, we break down the steps we use in the field at Hiking Manual so you can confidently choose a trim, warm, and packable midlayer for winter hiking and cold, changeable weather. If you also need a shell, see our waterproof shell picks for hikers in our guide to waterproof jackets.
Start with your use case and climate
Active movement (steady trail pace, scrambling, skinning) generates heat, so you’ll typically prefer lighter, trimmer insulation. Static tasks (belaying, camp chores, long glassing sessions) demand more trapped air and better wind control. Puffies excel for static warmth, and can feel bulky or noisy when you’re highly active, which is why many pros treat them as on/off layers rather than all-day pieces (see Barklow’s jacket layering system). In our field testing, treating puffers as on/off layers reduces sweat and preserves loft on climbs.
Wet versus dry matters just as much. In reliably damp or mixed conditions, synthetic insulation is the safer choice because it retains more warmth when damp and dries faster. In cold, dry climates, down’s superior warmth-to-weight and compressibility shine.
Warmth-to-weight ratio: A simple yardstick for efficiency—how much heat a jacket delivers relative to its mass. Higher ratios mean more warmth for fewer ounces. Down typically leads in dry cold because its clusters trap a lot of air per gram, easing pack burden on long hikes.
Pick insulation for your conditions
Down provides class-leading warmth-to-weight and compressibility, but loses loft—and thus warmth—when wet; synthetic retains more warmth when damp and is more forgiving in sustained moisture, according to OutdoorGearLab’s down jacket guide. Over time, insulation quality and construction drive longevity: lower-grade synthetic can mat or lose loft more quickly than premium fills, and poor quilting can exacerbate cold spots, as summarized in RefrigiWear’s puffer guide. In Hiking Manual cold-weather kits, we default to synthetic for persistently wet forecasts and down for high, dry cold to maximize efficiency.
Loft: The fluffy thickness created as insulation traps air inside baffles. That trapped air is the real insulator, forming a barrier that slows heat loss. Sustaining loft is the key to staying warm without heavy layers, so avoid compressing or soaking your puffer.
Down for dry cold and maximum packability
In cold, dry conditions, a lightweight, packable down midlayer is ideal under a shell. It vanishes in your pack and pops warmth the moment you stop. Down insulates best when it can loft, so don’t size your puffer or shell so tight that baffles are squashed—Outdoor Research’s layering guide emphasizes keeping space for loft. While a few synthetic models can be slightly lighter, down typically offers stronger warmth-for-weight; prioritize higher fill power and efficient baffle design to capitalize on that advantage.
Synthetic for wet, mixed, or budget-friendly durability
For wet or shoulder-season storms, synthetic insulation (such as PrimaLoft-type fills) keeps loft and warmth when damp and often dries faster than down. It also performs more reliably than untreated down in wet weather scenarios. Lighter synthetic hoodies work well over a base alone on the move, or paired with a thin fleece for flexible, stop-and-go systems—an approach echoed in mountaineering community discussion.
Read the warmth specs correctly
To avoid over- or under-buying, decode three specs together:
- Fill power: Down quality/loft per unit weight; higher numbers are more efficient.
- Fill weight: Total amount of insulation; this largely governs total warmth.
- Baffle type: Stitch-through is lighter but can leak heat at seams; box-wall/offset reduces cold spots at some weight cost.
Compare fill power and fill weight first, then consider baffle design to predict real-world warmth under your shell. This compare-then-validate approach is the same method we use in Hiking Manual reviews.
Fill power versus fill weight
Fill power measures down quality (e.g., 700 vs 800+), while fill weight is how many grams of that down go into the jacket. Overall warmth depends on both. As a rough guide for down midlayers under a shell: under ~150 g is lightweight/active, 200–250 g is mid-warmth, and over ~300 g is heavyweight and often too bulky for most hikers. Mountain Equipment’s down clothing guide details how these variables interact.
“Higher fill power indicates warmer down per gram, but total warmth is governed by the fill weight that actually goes into the jacket.”
Baffle construction and cold-spot control
Stitch-through construction is light and compressible, but every stitch is a potential cold line where heat escapes. Box-wall or dual-offset baffles reduce cold spots and feel warmer in wind, usually adding a few grams while still layering cleanly under a shell. More seams can also be weak points for wind and moisture; pick designs that balance seam count with weather resistance—see OutdoorGearLab’s insulated jacket roundup for examples of smart tradeoffs.
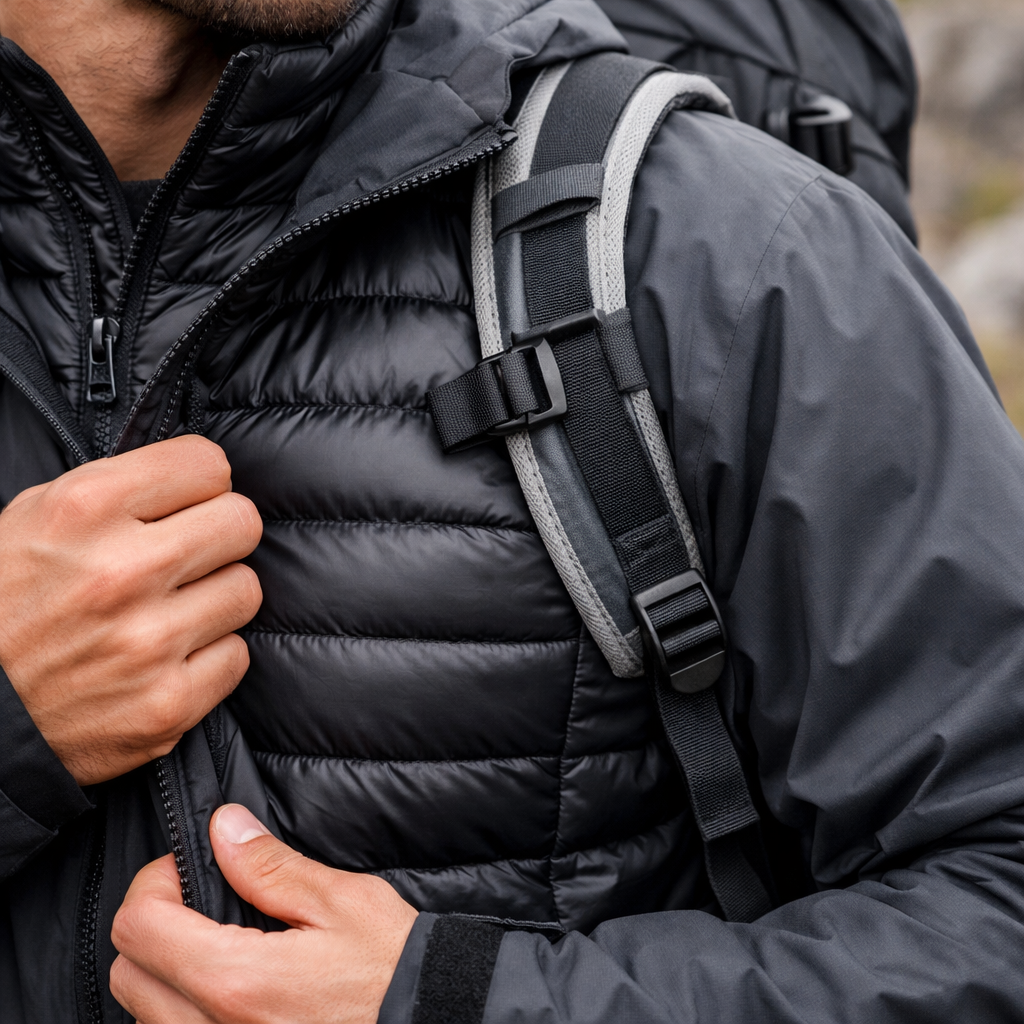
Check fit and layering compatibility under your shell
Try the puffer under your intended shell. You may need to size up the shell for bulkier midlayers. For close-to-body layering with lighter models, aim for a trim, not tight, fit that avoids bunching. Remember: down must have space to loft; a too-snug shell robs heat. At Hiking Manual, we always test midlayers under the actual shell to confirm no loft loss at shoulders and hem.
Test loft room, mobility, and seal points
- Movement tests: reach overhead, cross arms, simulate a scramble. Ensure no hem lift, shoulder binding, or crushed baffles.
- Seal points: cuffs, hem, collar/hood should touch gently without gaps or compression that creates drafts.
- Layer stack: base + light fleece under the puffer, shell over top. This stack controls moisture and preserves warmth on stop-and-go days.
Hood, collar, cuff, and hem interactions with your shell
- Hood nesting: the puffer’s hood should sit comfortably under your shell hood without blocking vision; collar stacks shouldn’t dig into your chin.
- Cuffs: low-bulk or elastic cuffs should slide inside shell sleeves; keep adjusters usable with gloves.
- Hem: ensure drawcords don’t form pressure points under a hipbelt and that the shell’s drop hem overlaps the puffer to block wind.
Prioritize weather resistance and durability
Think of the puffer as insulation; your shell is the real weather shield in sustained rain or wet snow. For cool, dry wind, a light softshell over a puffer can suffice, but swap to a true hardshell when precipitation builds.
DWR (Durable Water Repellent): A finish that makes fabric bead and shed light moisture. It’s not waterproof, but it slows “wetting out,” buying time to don your shell and stay warmer. Refresh DWR periodically to maintain performance as abrasion and washing wear it down.
Shell fabric denier and DWR
Lightweight ripstop face fabrics with an effective DWR shrug off drizzle and abrasion from pack straps, but a hardshell should cover the puffer in sustained rain. Quilting patterns influence both fit and durability; well-placed geometric baffles can improve shaping and reduce migration of insulation over time. Remember that every stitch is a potential wind/water entry point, so balance seam count with your packability needs.
Hydrophobic treatments and long-term loft retention
Hydrophobic down helps resist moisture uptake, but synthetic insulations still perform more predictably when wet. Over the long haul, cheaper synthetics can lose loft faster; choose reputable fills and durable constructions to preserve warmth. Good care—washing correctly and restoring loft—extends performance (more below).
Evaluate weight, packability, and on-trail usability
A good hiking puffer is both warm and easy to carry. Modern pieces can be remarkably light for the heat they deliver. Define packability for your needs: how small it compresses and how neatly it stows. First Lite’s packable insulation overview illustrates how purpose-built pieces stuff into pockets and rebound to full loft quickly. At Hiking Manual, we bias toward pieces you’ll actually carry: light, compressible, and quick to rebound.
Always follow the shell-over-puffer rule in rain to protect loft and safety.
Target carry weight and compressibility
- If you’ll stash the layer often, target sub-400 g with strong compressibility and a stuffsack or self-stowing pocket.
- If you’re mostly static in deep cold, accept more fill weight (see ranges above) and a larger packed size for comfort.
Sample builds for layering under a shell:
| Build | Typical fill weight | Baffle type | Pros | Watch-outs |
|---|---|---|---|---|
| Lightweight “action” puffer | 120–150 g | Stitch-through | Very packable; low bulk under shells; breathes better while moving | More seam cold spots; limited for long, static stops |
| Mid-warmth “stop-and-go” puffer | 200–250 g | Box-wall or offset | Warmer at seams; better wind control; still layers cleanly | Slightly heavier; packs a bit larger |
Pocket layout, hem adjusters, and glove-friendly controls
- Choose low-bulk hem drawcords that remain reachable under a shell; avoid big cord locks where a hipbelt rests.
- Hand pockets set higher clear hipbelts; add a small internal chest pocket for phone/GPS.
- Prefer glove-friendly zipper pulls, minimal exterior toggles, and low-profile cuffs for smooth nesting under shells and gauntlet gloves.
Plan for longevity, repair, and care
Durable face fabrics, thoughtful quilting, and reliable zippers keep a puffer running for seasons, not months. Bring a tiny field kit—your puffy is a crucial survival layer, and fast fixes can preserve warmth when it matters. Our trail kits always include a small strip of tenacious tape and a needle for quick, reliable repairs.
Field repairs and fabric toughness
- For small tears: clean, then apply tenacious tape; for seam nicks, a needle and nylon thread can buy time.
- Select face-fabric denier for your terrain: higher denier resists abrasion better but adds grams and packs slightly larger.
- If a baffle seam fails, tape temporarily to stop down migration and seek a pro repair to restore uniform loft.
Washing, drying, and storage to preserve loft
- Wash with down- or synthetic-specific detergents, rinse thoroughly, then dry fully (down: low heat with clean tennis balls) to restore loft; inadequate drying flattens insulation and reduces warmth over time.
- Store uncompressed on a hanger or in a large sack. Refresh DWR when water stops beading.
- Reaffirm the system: puffer as inner insulation, shell on top in wet conditions to extend lifespan and performance. For more winter system tips, see our cold-weather hiking jacket guide.
Packability: How small a jacket compresses for stowing in a pack or pocket, and how well it rebounds to full loft. Highly packable puffers save space, reduce carry fatigue, and encourage you to bring critical warmth “just in case” without overloading your daypack.
Frequently asked questions
What fill power is best for a low-bulk midlayer under a shell?
Aim for higher fill power (700–800+) to maximize warmth-to-weight, then confirm the fill weight suits your climate. In Hiking Manual tests, total grams of fill and baffle design ultimately decide real warmth.
How snug should a puffer fit if it is going under a hardshell?
Choose a trim fit that allows free movement and leaves room for loft; at Hiking Manual we prioritize zero hem lift and free shoulders. If your midlayer is bulky, size up the shell so it doesn’t crush insulation or restrict range.
Do I need hydrophobic down if I always wear a waterproof shell?
It helps, but is optional if your shell stays on in wet weather. In persistently damp climates or frequent stop-and-go, we favor synthetic insulation because it’s more forgiving when moisture sneaks in.
Is stitch-through construction warm enough for winter hiking?
Yes for active use or milder winter days, but it has more seam cold spots. For colder, windier trips or longer stops, we recommend box-wall or offset baffles for better heat retention.
How light is light enough for a packable midlayer?
Many Hiking Manual testers target sub-400 g with strong compressibility for all-day carry. If you run cold or take long static breaks, accept more fill weight and a slightly larger pack size.
Looking to compare shell options? See our best waterproof hiking jackets for men. Want to go deeper into materials? Browse Hiking Manual’s synthetic insulation articles on Hiking Manual.