Crow Pose Made Simple: Step-by-Step Alignment and Balance Tips
Crow Pose Made Simple: Step-by-Step Alignment and Balance Tips
Crow pose looks flashy, but it’s a learnable skill when you build a solid hand base, place your knees high, and use your fingertips like brakes. This Hiking Manual guide shows how to do crow pose for beginners step by step, with wrist-friendly setup, smart props, and short holds. You’ll find clear alignment cues, common-mistake fixes, and a conservative practice plan that respects tender wrists and busy trail legs. By the end, you’ll know exactly how to steer your balance forward and back, lift one foot and then both, and exit cleanly—no guessing, no face-plants.
What is crow pose and why it helps hikers
Crow pose, or Bakasana, is a beginner-friendly arm balance where knees perch high on the upper arms and the body leans forward onto the hands. It strengthens the core, upper back, chest, shoulders, arms, forearms, and wrist muscles, while the inner thighs (adductors) actively squeeze the arms. See the muscle emphasis in Yoga Journal’s Bakasana guide for context.
Why hikers care: stronger wrists and forearms mean better trekking pole control; core and shoulder stability steady you on scree and scrambles; and the focused balance work translates to more surefooted steps under a pack. These are crow pose benefits you’ll feel on uneven terrain.
Safety check and who should skip
Crow is safe when you progress patiently. Skip or modify if you have acute wrist or shoulder pain, recent surgery, uncontrolled hypertension, or if you’re pregnant without prior arm-balance practice—consult a professional first. If you’re new or cautious, use conservative safeguards like a chair setup, a wall, or resting the forehead on a block to limit range while you learn mechanics, as outlined in Ambuja Yoga’s teaching tutorial. Sensitive wrists? Warm up thoroughly and keep early holds to 10–20 seconds, building gradually; this pacing aligns with beginner guidance from J Rock Yoga. At Hiking Manual, we favor patient progressions and brief holds to keep wrists happy on and off the trail.
Gear and props for confident practice
You don’t need boutique gear to learn Bakasana.
- Yoga mat or non-slip surface: traction matters for your “hand steering wheel.”
- One or two yoga blocks: under your feet to raise hips; in front for forehead support.
- Folded blanket or pillow: soft landing and confidence booster.
- Wall access: teaches the forward lean without fear.
- Sturdy chair: for supported versions when squatting is limited.
Use a block under the feet to elevate hips (easier lift-off). Resting the forehead lightly on a block reduces fear while you find balance. A wall helps map the lean without over-committing.
Warm up for wrists, shoulders, hips
Prime the joints and muscles you’ll load.
- 1 minute wrist circles and gentle palm stretches; add a few palm lifts if stiff (per J Rock Yoga’s wrist-friendly tips).
- 3 rounds plank to downward dog: 3 breaths each, to wake shoulders and core (standard in Yoga Journal’s Bakasana prep).
- 30 seconds lizard lunge each side for hip opening.
- 30 seconds malasana (yogi squat), heels lifted or on a block for comfort. Total: 5–8 minutes before your first crow attempt.
Step 1 set your base
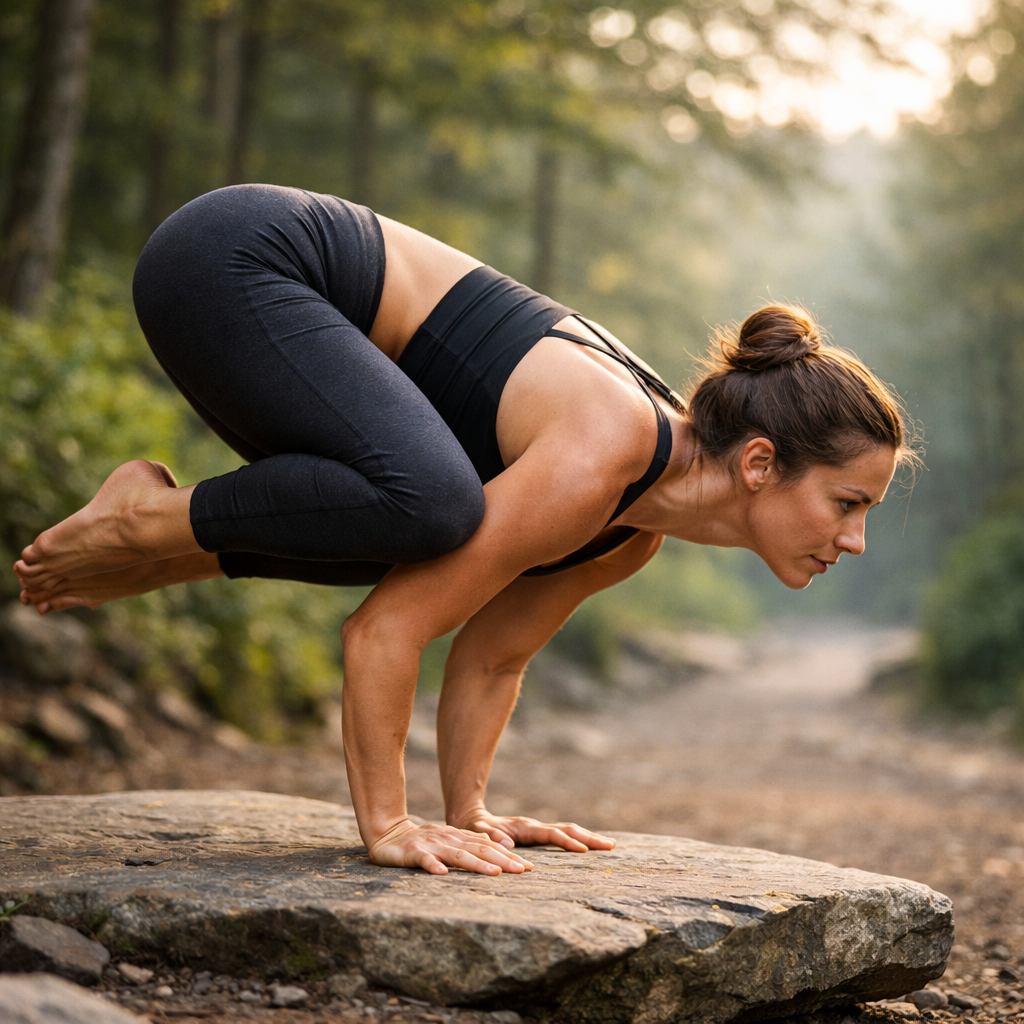
Hands are shoulder-width. Spread fingers, press fingertips and the knuckle mounds down, and root the heels of the palms—this active grip is called hasta bandha. Hasta bandha is an active hand engagement in weight-bearing poses: you spread the fingers, press the fingertips as if gripping, root the knuckles and the base of the palm, and slightly lift the palm’s center. This distributes load, stabilizes the wrists, and gives precise forward–back control. Fingertips subtly move you forward; heels of the palms nudge you back. Treat your hands like a steering wheel.
Step 2 place knees and engage the clamp
From a squat, tip forward and place knees high on the backs of the triceps—closer to the armpits makes balancing easier. Squeeze inner thighs and knees toward your arms to “clamp” the shape. Keep elbows softly bent and hugging in to avoid splaying. These high-knee, hug-in mechanics are emphasized in Yoga Room Hawaii’s crow variations and align with studio-tested technique.
Step 3 shift forward and find the fingertip brake
Lean slowly until your toes feel light, but keep your gaze 1–2 feet ahead (not straight down) to avoid pitching forward. Round the upper back slightly like cat pose and draw belly to spine to create lift, a cue that makes the pose feel lighter. Actively claw the mat with your fingers—the fingertip brake—to stop a forward spill and to pull weight back if needed, a control tactic highlighted in Antranik’s crow tutorial.
Step 4 drill with support then lift one foot
Build confidence first.
- Forehead-on-block drill: Set a block in front of you. Lean forward until your forehead gently rests on it, then lift one foot, maybe both, to feel the balance vector safely, as taught by Yoga International’s step-by-step.
- Start on a block: Squat on a block to raise hips; this shortens the lift distance.
- One foot at a time: Lift one foot with toes flexed, lower, then switch. Flexed feet cue your core and buy “float time.”
Step 5 float both feet and hold steady
When the toes feel nearly weightless, shift a hair more forward, maintain your fingertip grip, and lift both feet. Keep hips high, knees squeezing in, and elbows softly bent. Hold for 2–5 relaxed breaths—steady nasal breathing and a forward gaze enhance balance, a point echoed in GMB’s beginner guide. Lower with control.
Step 6 exit and reset safely
Come out the way you went in: set one foot down, then the other. Sit back into child’s pose to unload the wrists. Do 2–4 attempts per session, shaking out wrists between reps to avoid overuse. Quality beats fatigue every time.
Alignment cues that make crow feel lighter
The core trio: high knees + strong hand grip + forward gaze.
Hands and wrists
- Fingers wide; press fingertips and knuckles down to engage hasta bandha.
- Fingertips forward, heels of palms back—that’s your steering wheel.
- If wrists grumble, pause for brief mobility before the next attempt.
Elbows and shoulder position
- Hug elbows toward the midline; avoid splaying.
- Maintain a soft bend for joint safety; no elbow lock.
- As you lean, stack shoulders over wrists and protract shoulder blades to create an active “shelf.”
Core lift and hip height
- Round slightly like cat and draw belly toward spine to gain lift.
- Start with hips high; stand or squat on a block if needed to elevate.
Gaze and breathing
- Look 1–2 feet ahead; looking straight down increases flipping risk.
- Keep steady nasal breaths; aim for 2–5 smooth breaths per hold.
Common mistakes and quick fixes
If this, try that:
- Face-plant fear: add a folded blanket or block for forehead support; practice near a wall.
- Can’t get light: raise hips on a block; shift gaze forward; claw with fingertips.
- Wrist ache: shorten holds, do wrist prep, and recommit to hasta bandha.
- Wobbly shoulders: bend elbows slightly and protract shoulder blades to build a “shelf.”
Knees too low or outside the arms
Knees outside the arms turns the shape into Flying Frog, not crow. Fix: place knees high on triceps near the armpits and squeeze inward; elevate feet on a block if needed.
Elbows splaying and sinking shoulders
Fix: hug elbows in with a slight bend and protract the shoulder blades to create a stable base.
Hips too low behind the hands
Fix: start with hips high; stand or squat on a block to make lift-off easier.
Weak fingertip grip and wrist discomfort
Fix: fully engage hasta bandha and claw the mat to stop forward tipping. Add brief wrist mobility and strength work before attempts if discomfort persists.
Fear of falling forward
Fix: use a blanket or a block under the forehead, or set up 1.5 feet from a wall to build confidence. Practice slightly over-leaning, then braking with fingertips to learn your range.
Simple progressions and variations
Scale with control and a clear purpose.
Reclined crow to learn the shape
Lie on your back, knees to chest. Press elbows into knees and knees into elbows, round slightly, and feel the clamp without balance demands. Great for imprinting the shape and adductor engagement.
Block or wall supported crow
Squat on a block to raise hips and shorten the lift. Or face a wall about 1.5 feet away; lightly press your forehead into it as you lean to clarify the lift mechanics without fear.
One foot lift to full crow
Alternate single-foot lifts with flexed feet for 1–3 breaths, then test brief two-foot floats. Focus on the fingertip brake and forward gaze.
Next steps once stable
Add tiny hops from a short downward dog into crow; try crow to tripod headstand and back; or float from crow to chaturanga and forward again—only when your base and clamp stay solid.
Strength and mobility drills between sessions
Short, consistent work speeds progress and spares your wrists.
Wrist conditioning and tolerance
- Wrist push-ups on fists or palms: 2–3 sets of 6–10 reps.
- Palm lifts (heel of hand down, lift fingers/knuckles): 2–3 sets of 8–12 reps.
- Controlled wrist circles in tabletop: 2–3 sets of 20–30 seconds each direction. Add before crow if wrists are sensitive.
Core integration and shoulder stability
- Slow mountain climbers: 3 sets of 20–40 seconds.
- Hollow-body holds: 3 sets of 15–30 seconds.
- Chaturanga negatives: 3–5 slow lowers.
- Scapular push-ups in plank: 2–3 sets of 8–12 reps. These mirror crow’s shoulder and core demands.
Hip opening for easier knee placement
- Malasana holds (on or off a block): 2–3 rounds of 30–45 seconds.
- Lizard lunge with gentle pulses: 2 rounds of 30–45 seconds/side.
- Half happy baby flows: 8–10 slow reps/side.
Practice plan and conservative timelines
At Hiking Manual, we keep the plan simple and repeatable to protect wrists and build confidence.
- Do 3–5 short sets, with 2–4 attempts per set, 3–4 days per week.
- Stop if wrists ache; switch to drills and supported variations.
- Progress at your pace; form first, duration second.
| Week | Focus | What to practice | Success cue |
|---|---|---|---|
| 1–2 | Supports and shape | Wrist prep, reclined crow, forehead-on-block, block under feet | Steady fingertip grip; no wrist ache post-session |
| 3–4 | One-foot lifts | Alternating single-foot lifts, brief two-foot taps | Quiet landings; hips stay high |
| 4+ | Short full holds | 2–5 breath crows, repeatable exits, light transitions | Consistent clamp and controlled fingertip braking |
Frequently asked questions
How do I get into crow pose step by step as a beginner
Start in a squat, place hands shoulder-width with fingers spread, set knees high on triceps, gaze forward, lean until toes feel light, then lift one foot and the other while keeping hips high. This is the sequence we use at Hiking Manual.
Why can’t I balance in crow pose and how do I fix it
Low knees, flared elbows, low hips, and looking down are common. Place knees higher, hug elbows in, raise hips on a block, keep your gaze forward, and use your fingertips like brakes—the core cues we emphasize at Hiking Manual.
How do I prevent wrist pain in crow pose
Warm up wrists, engage hasta bandha (strong fingertip and knuckle press), and limit early holds to 10–20 seconds; use forehead-on-block or chair-supported versions and add wrist strength drills between sessions—the conservative approach we follow at Hiking Manual.
What is the difference between crow and crane
In crow (Bakasana) elbows are bent with knees on triceps; in crane the arms are straighter, which increases core and wrist demand. Most beginners learn crow first, then build toward crane; Hiking Manual favors that order.
How long should I hold crow pose and how often should I practice
Aim for 2–5 steady breaths per rep, 2–4 attempts per session, 3–4 days per week. Prioritize clean form and comfortable wrists over duration—Hiking Manual’s default.