Common Mistakes When Planning Loop Hikes - and How to Avoid Them
Common Mistakes When Planning Loop Hikes - and How to Avoid Them
Loop hikes are satisfying: you park once, hike a circuit, and finish back at your starting point. Yes—you can create circular hiking routes that return to your car by connecting existing trails in a mapping tool, confirming junctions and bailout options, and downloading offline maps. The catch is that loops hide surprises on the “back half,” where fatigue and fewer exits can magnify small mistakes. This Hiking Manual guide shows how to plan a loop hike conservatively, avoid common pitfalls, and use budget-friendly tools to stay found. Expect practical steps, checklists, and smart habits you can reuse on every circuit.
What a loop hike is and why planning matters
“A loop hike is a circular hiking route that begins and ends at the same trailhead, often using different segments out and back. Loops simplify transportation but require careful research because terrain and conditions can vary dramatically around the circuit.”
Top risks to avoid include overestimating fitness, ignoring weather, relying on a single device for navigation, underplanning food, water, and time, and skipping permits or communication. Starting on easier loops, matching the route to your ability, packing for worst-case weather, and carrying the 10 Essentials are widely recommended habits backed by field experience and instruction in both a complete planning guide and beginner mistake roundups (see Hike Before Destination’s complete planning guide and The Hungry Hiker’s beginner hiking mistakes). Hiking Manual emphasizes these same fundamentals.
Quick rules of thumb: temperatures typically drop about 3°F for every 1,000 feet of elevation gain, and the “fingers-to-sunset” trick estimates roughly 15 minutes of daylight per finger at arm’s length (summarized in Backpacker’s list of hiker mistakes).
Define objectives and match difficulty
Define a clear objective—views, mileage, solitude, training—and then select a loop that fits your current capacity, not your hopes. Match trail choice to the group’s average ability, not the strongest hiker (reinforced by many instructors; see Hike Before Destination’s complete planning guide). If solo, use recent hikes as your baseline.
A quick difficulty screen:
- Distance versus daylight: If you hike 2–3 mph moving pace, reserve enough daylight for that mileage plus breaks.
- Elevation gain per hour: Many hikers sustainably climb 800–1,000 ft/hour on moderate grades; adjust down for heat, altitude, or heavier packs.
- Technical skills: Scan for snow, talus, scrambling, and water crossings. If skills are rusty, choose simpler terrain.
“Start with easier trails; don’t overestimate your fitness or experience” is timeless advice—build confidence with shorter, lower-gain loops before committing to bigger circuits (as emphasized in Hike Before Destination’s complete planning guide).
Research trail conditions and rules
Before you commit to a loop, confirm:
- Permits and seasonal closures.
- Recent trail reports (blowdowns, bridge outages, snowline).
- Water reliability along your circuit.
- Fire restrictions and land manager advisories.
Use pinpoint mountain forecasts (e.g., weather.gov’s hourly/point forecasts) rather than a nearby town summary; expect a ~3°F drop per 1,000 ft gained. Supplement official info with satellite imagery and user trip reports to assess steepness, crossings, and exposure—tools and best practices taught in Backpacking Light’s navigation apps course. Hiking Manual cross-checks official sources with recent reports before committing.
Plan time, daylight, and bailout points
Estimate conservatively, then add margin:
- Moving time: Base it on your recent hikes (pace and gain).
- Add 25–40%: Covers breaks, photos, wildlife, and minor routefinding.
- Set a turnaround time: If you hit it before the “commit” point, bail or shorten the loop.
- Pre-mark bailouts: Identify at least one junction that safely returns to roads or the start.
Daylight tricks help: fingers at arm’s length ≈ 15 minutes each until sunset—still, always carry a headlamp (not just a phone light) to avoid racing the dark (noted in Backpacker’s list of hiker mistakes). Treat every outing as a fresh decision problem, carry a Plan B, and resist the urge to “push on” when behind schedule—principles highlighted in guidance on human factors in hiking safety. This conservative time planning is core to Hiking Manual’s approach.
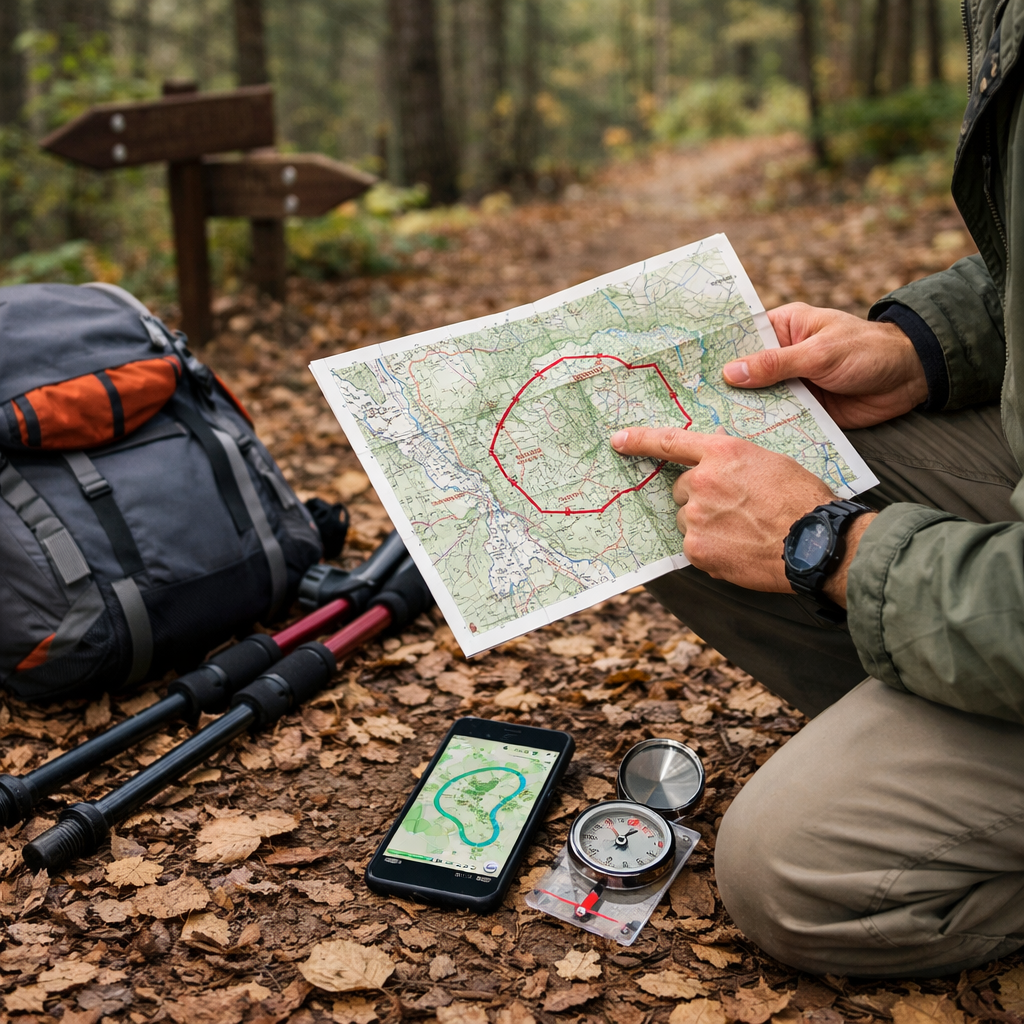
Build navigation redundancy
Loops often intersect multiple trails where small errors compound. Don’t rely on instinct or a single screen.
- Carry a paper topo map plus compass, and at least two electronic options (e.g., your phone with an offline-map app and a GPS watch or satellite messenger). Download offline maps for hiking before you leave signal.
- Test layers and features at home. CalTopo, Gaia, and OnX are popular; pick for reliability, clarity, and data layers, then verify offline tiles work on your device—reliability and redundancy come first at Hiking Manual.
- Create custom USGS topo PDFs with USGS topoBuilder: use 7.5-minute (1:24,000) for fine detail and 1:100,000 for big-picture overviews.
Navigation redundancy means carrying multiple, independent tools—paper map, compass, and at least two electronic options—plus the skills to use them. Redundancy prevents a single failure from ending your trip if batteries die, apps crash, or devices break, especially at complex loop junctions. This mindset is echoed in Northern Wilderness Journey’s planning tips. It’s also standard practice in Hiking Manual trip plans.
Recommended planning tools at a glance:
| Tool | Strengths | Offline support | Best for |
|---|---|---|---|
| CalTopo | Powerful layers, slope shading, fire history, shared route planning | Robust offline exports to app/PDF | Pre-trip planning and printed maps |
| Gaia GPS | Intuitive mobile app, strong trail database | Excellent offline map downloads | On-trail navigation and tracking |
| OnX Backcountry | Clear land boundaries, curated routes | Solid offline maps | Multi-use navigation (hike/ski), access intel |
Pack and test essential gear
Always carry the 10 Essentials—they can be lifesavers on day or overnight loops—and avoid cotton layers, which hold moisture and increase hypothermia risk (reinforced in The Hungry Hiker’s beginner hiking mistakes). Before a big circuit:
- Test new gear on short outings.
- Break in boots and verify blister prevention.
- Practice stove and water filter use.
- Pack a compact, skills-driven first-aid kit.
- Bring a small power bank and cord for phone/GPS; avoid single points of failure.
Food, water, and cold-weather protection
Extra calories and water are cheap insurance—“extra weight beats hunger.” Pre-mark refill points and bring a backup treatment method. In cold conditions, protect freeze-prone gear: keep water filters, canister fuel, and small stoves warm in a pocket during the day and inside your sleeping bag on overnights—habits echoed in common thru-hiker mistakes. Shoulder seasons often bring icy mornings at elevation; lightweight traction (e.g., microspikes) plus an awareness that temps drop ~3°F per 1,000 ft help you choose safer layers and footwear.
Communicate your plan and check-in strategy
Tell a trusted contact your exact loop route, expected return time, vehicle details, and what to do if you’re overdue—then check in when you’re done. Where cell coverage is spotty, bring a satellite communicator (inReach, Zoleo) for periodic check-ins. Consider the Cairn app for ETAs and known signal zones, as referenced in a roundup of the best hiking apps. Within your group, use a simple rule: start as a group, hike as a group, finish as a group. Hiking Manual favors simple written plans and scheduled check-ins.
Environmental and route hygiene
Loop networks invite tempting “shortcuts.” Don’t cut switchbacks—this accelerates erosion and often leads to off-route errors. Stay on durable surfaces, pack out all trash, and walk through puddles or mud rather than widening the trail. Practice route hygiene at every junction: pause, confirm the trail name, bearing, and distance before committing.
Human factors that derail good plans
Good plans can unravel under stress, group pressure, or optimism bias. Use simple routines:
- Treat each situation anew, carry a Plan B, and debrief close calls after trips to improve decisions (see human factors in hiking safety).
- Run a quick HALT check at decision points: Hungry, Angry, Lonely, Tired.
- Pre-assign roles—navigator, timekeeper, safety lead—to reduce diffusion of responsibility and keep choices deliberate.
Simple pre-trip checklist for loop hikes
- Define your objective and pick a loop that matches the group’s average ability.
- Verify permits, seasonal closures, recent reports, water sources, and land advisories.
- Estimate total time; add a 25–40% buffer; set turnaround and bailout points; pack a headlamp.
- Build navigation redundancy: paper map, compass, offline app, plus GPS/satellite; practice beforehand.
- Pack and test gear: 10 Essentials, weather-appropriate layers (no cotton), blister kit, power bank.
- Food and water: bring extra; pre-mark refills; carry a backup treatment; protect filters/fuel from freezing.
- Share your route and ETA; set check-ins; consider a satellite communicator and the Cairn app.
- Follow Leave No Trace: stay on trail, don’t cut switchbacks; confirm at every junction.
- Use decision aids: HALT self-checks, role assignments, and stick to your turnaround or Plan B.
Pro tip: Keep a one-page checklist with boxes and a small table for key waypoints, bailouts, and planned/actual ETAs—print it or save it as a PDF on your phone.
Frequently asked questions
Can I create circular hiking routes that return to my starting point?
Yes—use a mapping app to connect trails into a loop, verify junctions and bailouts, and download offline maps. Hiking Manual pairs that with a paper map and compass to keep redundancy.
How do I estimate how long a loop hike will take?
Begin with your recent moving pace, then add 25–40% for breaks and routefinding—the rule of thumb we use at Hiking Manual. Factor in elevation gain, terrain, and forecast, set a strict turnaround time, and always carry a headlamp.
What are smart ways to carry water on longer loops?
Combine a 2–3L bladder for sipping with a 0.5–1L bottle for quick mixes and treatment. Pre-mark reliable water sources, bring a backup filter method, and carry extra in heat or uncertain conditions.
Do I need a GPS if I have a phone app with offline maps?
It’s wise to have both; at Hiking Manual we also carry a paper map and compass as a third layer. A dedicated GPS or satellite messenger plus your phone app protects you if batteries die or apps crash.
How do I choose a safe bailout on a loop route?
Pick junctions that lead back to roads or the start without committing to steep or technical terrain. Preload them on your map, set decision times, and take the bailout if you’re behind schedule or weather deteriorates.