Beat Deep Snow: Durable Hiking Boots With Reliable Ice Traction
Beat Deep Snow: Durable Hiking Boots With Reliable Ice Traction
Winter hikes demand more than warm feet—they demand dependable bite on packed snow and ice. The best snow boots for hiking on ice and deep snow combine flexible cold-rated rubber, aggressive lugs that shed slush, and waterproof builds that don’t quit mid-season. If you’re shopping today, proven hiking-focused models include KEEN Revel IV Polar, Salomon X Ultra Mid Winter, Oboz Bridger Insulated, Merrell Thermo lines, Danner Arctic 600, and Columbia Bugaboot Celsius. Built-in ice rubber compounds help on slick surfaces, but they’re not magic; always plan to carry microspikes for mixed or uncertain conditions. Below, we cut through the marketing to help you choose winter hiking boots and traction that match UK/EU winter realities—packed paths, wind-polished ice, drifting snow, and wet slush. Hiking Manual prioritizes UK/EU conditions and keeps recommendations current through the season.
Who this guide is for
This guide is for beginner to intermediate walkers, dog owners, and practical planners navigating UK winter hiking—from Peak District slabs to Scottish low paths—where trails alternate between packed snow, slush, and glare ice. We focus on winter hiking boots and snow boots for hiking that balance value, safety, and durability, including budget winter boots that don’t compromise on icy trail traction. Expect plain-English risk notes, sensible fit tips, and a bias for reliable offline navigation with turn-by-turn voice guidance (Komoot) so your gloves can stay on in driving sleet.
Safety first in deep snow and ice
No outsole compound guarantees sure-footedness on ice; even the grippiest winter rubber can skate on refrozen sheets, and traction aids are a smart baseline on mixed days, as echoed by Backpacker’s winter boot tests (see Backpacker winter boot tests).
“Glare ice is a hard, slick ice sheet formed by refreeze or compacted meltwater. It offers almost no texture for rubber to grip, making slips likely even with aggressive lugs. On glare ice, add microspikes or crampons, and shorten stride to keep your center of mass over your feet.”
Go/no-go checklist:
- Surface: Is it packed snow with texture, or hard, refrozen ice?
- Slope: What’s the steepest sustained angle you’ll cross or descend?
- Exposure: Wind chill and blowing snow reduce dexterity and reaction time.
- Daylight: Do you have a margin for slower, careful footwork?
- Bailouts: Can you reroute, cut the day short, or retreat safely?
- Default: Carry microspikes on uncertain days; turn back if your traction can’t match the terrain.
What makes a boot reliable on ice
The best winter outsoles use softer, cold-stable rubber so they stay pliable and grippy as temperatures drop, while lug patterns with sharp edges and open voids bite into snow and shed slush instead of smoothing over. Standout compounds include Vibram Arctic Grip, noted for unusually good grip on wet and dry ice without metal studs (see Treeline Review’s winter hiking boots), and KEEN’s Polar Traction rubber, engineered for winter-specific friction. Still, physics wins on polished ice: in extreme conditions, add a traction device. At Hiking Manual, we always pack microspikes on mixed winter days.
Durability features that actually last
Longevity starts with materials and weak-point reinforcement. Look for:
- Uppers: full-grain leather or tough synthetics with abrasion guards where crampon harnesses rub.
- Lacing: metal eyelets/hooks that won’t deform in cold; dial or BOA-style closures can distribute pressure but inspect cables for fray.
- Underfoot: supportive shanks/midsoles that won’t fold on sidehill ice.
- Weather seals: a gusseted tongue—sewn to the boot sides—closes the gap under laces to keep out snow, slush, and grit, which also preserves warmth and comfort on long wet days (see Switchback Travel’s winter boots guide).
Reality check: lacing hardware and tongue seams tend to fail first. And traction device elastomer harnesses can age faster in deep cold—check for cracks and replace if stretched or brittle (see GearJunkie’s traction device guide).
Warmth without excess weight
More insulation generally means heavier boots, which can increase fatigue and reduce agility on longer hikes—so match warmth to pace and weather rather than maxing out by default (see Treeline Review’s winter hiking boots). For most UK winter hikes, medium insulation hits the sweet spot.
Warmth tiers at a glance:
| Warmth tier | Typical use | Insulation feel | Ideal temps/pace |
|---|---|---|---|
| Light | Active hiking and fast paces | Minimal-to-light synthetic; relies on movement | Around freezing and above, high-output |
| Mid | All-day hikes below freezing | 200–400 g synthetic or equivalent lining | -5 to 0°C, steady pace |
| Heavy | Sub-freezing overnights, low-output days, standing around | 400 g+ synthetic, felt liners, or double construction | -10°C and below, slow pace or snowshoeing |
Fit and sizing for winter socks and spikes
Size to allow a warm sock plus a thin liner without toe-bang on descents. Prioritize a snug heel lock that survives uphill tests, with enough forefoot room for natural splay as socks compress over the season. Test-fit with your microspikes or strap-on crampons to confirm harnesses seat securely without hot spots.
Quick tips:
- Use removable insoles for faster drying; swap between pairs on multi-day trips.
- Consider aftermarket insoles for arch support and to stabilize the heel.
- Re-check fit mid-season as thick socks pack out and volume changes.
Shaft height, gaiters, and weatherproofing
Higher-cut boots add coverage, structure, and insulation for drifts and post-holing, while mid-cuts favor mobility on packed trails. Gusseted tongues help block splash and spindrift; for proper deep-snow defense, pair high-cut boots with gaiters to stop snow from pouring in over the collar (see our gaiters roundup). Decision flow:
- Mostly packed paths and light snow: mid-cut for lighter feel.
- Frequent drifts, post-holing, or wet slogs: high-cut plus gaiters.
- Always confirm the waterproof bootie extends above your flex point—and keep it clean so the DWR can shed slush.
Best hiking gaiters for snow and rain — Hiking Manual
Traction devices to pair with your boots
Ice-specific rubber is helpful but not infallible. Extend your safe range by matching devices to terrain.
Terrain-to-device guide:
| Terrain | Recommended device | Spike length | Weight/aggressiveness | Notes |
|---|---|---|---|---|
| Packed snow/low-angle ice | Microspikes | ~8–12 mm | Light/moderate | Default winter choice; fast on/off; good edging control |
| Glare ice, rolling hills | Microspikes | ~10–12 mm | Moderate | Shorten stride; plant feet flat; poles help |
| Steep, sustained icy climbs/descents | Hiking crampons | ~16–25 mm (3/4"–1") | Higher/aggressive | More penetration and security; deliberate footwork required |
| Mixed rock/ice | Microspikes or low-profile hybrid | Short | Light | Expect faster wear on rock; step gently to preserve points |
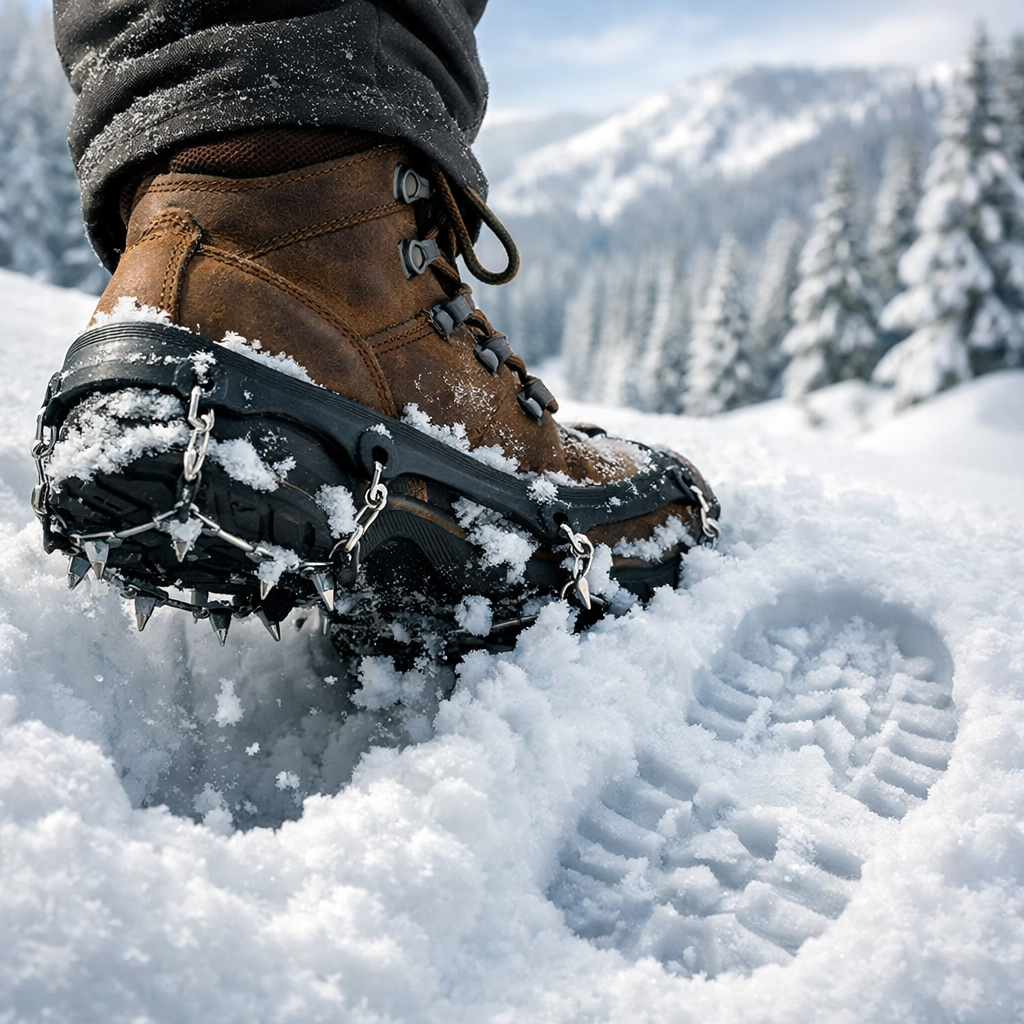
When to use microspikes
Microspikes are compact chains with short steel spikes that slip over boots, adding reliable bite on packed snow and ice without the bulk of mountaineering crampons; they pair well with insulated and standard hiking boots alike (see Treeline Review’s traction device guide). Kahtoola MICROspikes remain a long-running benchmark we trust for durability and hold, featuring 12 stainless-steel spikes mounted to plates that resist snowballing. They excel on packed trails and frozen paths, and are the go-to when snow depth stays under roughly 5 inches (see Oboz’s traction primer). Budget-friendly alternatives exist, but inspect harnesses and chains carefully.
When to use hiking crampons
Hiking crampons use longer, hardened spikes for steep, icy climbs and mixed snow/ice where microspikes run out of bite. They penetrate hard ice and deeper snow better but add weight and demand steadier footwork. Kahtoola K10 crampons, for example, use ten 3/4-inch chromoly spikes for deep-ice traction, with quick-on bindings for winter hikers (see CleverHiker’s winter traction roundup). As terrain steepens, spikes around 1 inch offer more security; mid-length options suit general icy hill paths. Models like the Hillsound Trail Crampon add an instep strap to lock fit on flexy boots.
Studded soles and when they make sense
Studded boots build carbide steel studs into the sole for always-on grip, a smart solution for icy commutes and short mixed walks. Icebug BUGrip models are standouts for dynamic-stud ice traction, trading indoor comfort and bare-pavement friendliness for exceptional bite when it’s slick (see GearJunkie’s winter boot guide). They shine for city-to-trail dog walks or quick, icy approaches where swapping to microspikes isn’t practical.
Budget-friendly picks and value tiers
You don’t need to overspend for safe, warm feet. Think in tiers—as we do in our guides—and pair boots with the right traction.
- Under £120 value boots: basic insulation and competent winter rubber. Pair with budget microspikes for most trail days.
- £120–£180 mid-range: better lugs, gusseted tongues, and stronger uppers. Pair with Kahtoola-style microspikes for packed snow/ice.
- £180+ high-value winter hikers: ice-oriented outsoles (e.g., Arctic Grip, Polar-focused rubbers) and dialed fit. Add K10-style hiking crampons for steep objectives.
Value table:
| Tier | Typical outsole tech | Insulation range | Best use |
|---|---|---|---|
| Under £120 | General winter rubber | Light–mid | Commute, park paths, low hills with microspikes |
| £120–£180 | Refined lugs, winter rubber | Mid | Day hikes below freezing; packed trails with spikes |
| £180+ | Ice-rated compounds; advanced lugging | Mid–heavy | Steeper routes, snowshoeing, multi-day cold snaps |
Care, drying, and longevity tips
- Dry slow and low: remove insoles, stuff with newspaper, and air at room temp. Avoid radiators or direct heat that can delaminate midsoles and harden rubber.
- Inspect often: check eyelets/hooks, lace integrity, gusset seams, and traction harness elastomers—replace suspect parts before big days.
- Clean and store: brush off salt and grit, reapply leather conditioner, and refresh DWR on fabric each season to preserve waterproofing and breathability.
Navigation and planning for winter routes
Plan conservative lines, build daylight buffers, and keep navigation offline in case batteries suffer in the cold. Download routes and enable voice prompts—Komoot’s turn-by-turn voice guidance is especially helpful when you don’t want to remove gloves. Before you go:
- Check avalanche advisories where relevant, plus wind chill and gusts.
- Confirm daylight window, group pace, and bailout options.
- Decide your traction plan (microspikes vs crampons) based on slope and likely surface.
- Match boots to route conditions; see our winter boot guide for vetted picks.
Best winter hiking boots for snow and ice — Hiking Manual
Frequently asked questions
Do I still need microspikes if my boots have ice-specific rubber
Yes—ice-specific rubber helps, but no outsole guarantees security on ice. Hiking Manual recommends carrying microspikes for packed snow and glare ice.
How warm should my winter hiking boots be for deep snow days
Match insulation to pace and temps: heavier for slow, sub-freezing days, lighter for fast hikes. Hiking Manual favors the lightest boot that keeps you warm without fatigue.
Can I use crampons or snowshoes with my hiking boots
Yes—strap-on hiking crampons pair with many hiking boots for steeper, icier terrain, and most insulated hikers work with snowshoes; confirm fit at home. Hiking Manual suggests testing with your exact socks and insoles.
How should winter boots fit with thick socks and insoles
Aim for a locked-in heel and wiggle room up front in thick socks; test fit with your insoles and traction devices. Hiking Manual prioritizes comfort under load and on descents.
What fails first on winter boots and how do I prevent it
Lacing hardware, tongue gussets, and traction elastomers go first; inspect and replace worn parts, and dry boots thoroughly between outings. Hiking Manual recommends pre-trip checks to prevent mid-hike failures.