Avoid Stranded Rides: Plan Routes Around Bike Repair Shops
Avoid Stranded Rides: Plan Routes Around Bike Repair Shops
A little forethought is the difference between rolling home and walking it. This Hiking Manual guide shows you how to plan a cycling route that intentionally threads past bike shops and public repair stands, with realistic bailout options if plans change. You’ll learn which bike-friendly route planner to use, how to add work-stand waypoints, and how to export GPX and download offline maps for reliable, turn-by-turn navigation. Favor low-traffic roads, verified service stops, and alternates you can switch to without cell service. The result: fewer surprises, faster fixes, and a safer, more confident ride.
Why plan routes around repair shops
Routing past bike shops and public work-stands reduces the odds you’ll be stranded and builds confidence. Cycling-first planners reveal bike lanes, surfaces, and safety filters that generic maps often miss, making it easier to align routes with your tires and skills (see Horner’s City Cycling guide) [1]. Linking services to your route means flats, loose bolts, or minor brake and shifting issues are solved faster than improvising on a shoulder—and local shop staff often share up-to-the-minute intel on closures or rough patches that don’t show on maps (BikePortland’s analysis highlights this community role) [2].
Public repair stand definition (40–50 words): A public bike repair stand is a fixed station—commonly near trails, campuses, transit hubs, or bike rooms—outfitted with basic hand tools and an air pump for do‑it‑yourself maintenance. It lets riders inflate tires or make quick adjustments without a mechanic, improving uptime and reducing walk-outs between shops (Sportworks overview) [3].
Step 1: Assess your bike, skills, and likely failures
- List your setup: bike type, drivetrain, brake type, tire size, tubed vs. tubeless, and any historical issues. Common mid-ride failures include punctures, loose bolts, and shifting misalignment. Be honest about what you can fix at the curb versus what needs a mechanic.
- Pack a minimal, proven kit: spare tube or plugs, tire levers, mini-pump or CO2, multitool with chain breaker, and a quick link. Practice fixing a flat and adjusting derailleurs at home; the fastest “repair stop” is the one you perform in five minutes on the trail.
- Bailout distance definition (40–50 words): Bailout distance is the shortest path from any point on your route to help—bike shop, transit, or town. Estimating it clarifies overall risk and where to insert waypoints and alternates. Keep your maximum comfortable walking or rolling window conservative, especially on rough surfaces or in bad weather.
Step 2: Choose a bike-aware route planner
Use cycling-first tools that expose bike lanes and surface type, and that support offline navigation and GPX export. Avoid relying solely on generic maps; they frequently miss protected lanes and surface quality that matter for comfort and safety [1]. At Hiking Manual, we prioritize planners that clearly show lane protection, surface type, and offline support for reliability.
Recommended options and strengths (choose by use case):
| Planner | Best for | Notable strengths |
|---|---|---|
| OsmAnd + BRouter | Power users and offline-first riders | Custom routing profiles, offline maps, bike-aware options [1] |
| GPX Studio | Precision pre-planning | Fine-grained editing, elevation checks, easy GPX export |
| Komoot | Touring and surface matching | Surface hints, POIs, social highlights, easy turn-by-turn [4] |
| Ride with GPS | Mixed-terrain precision and device sync | Detailed cuesheets, analysis, Garmin/Wahoo/Hammerhead sync [4] |
| Veloplanner | EuroVelo/regional networks | Network-centric routing across established cycle routes [4] |
| Wikiloc | Under-documented regions | Community tracks to discover viable lines off the beaten path [4] |
Look for features like cycling heatmap overlays, bike lane visibility, surface type previews, multimodal trip planning, and the ability to provide route alternatives.
Step 3: Map a primary route with bike-friendly preferences
- In a cycling planner (Ride with GPS, Komoot, Veloplanner), enable low-traffic or bike-lane preferences. Sketch your route, review elevation and surfaces, and export GPX if you’ll use a bike computer [4].
- Practical workflow: scout key segments in satellite and Street View to check shoulders and construction, then build the final turn-by-turn route in a bike-specific tool for accurate cues and surfaces [5].
- Where supported, turn on route alternatives and traffic or safety layers. Time of day shifts risk; selecting between options lets you choose the safest line for current conditions [6].
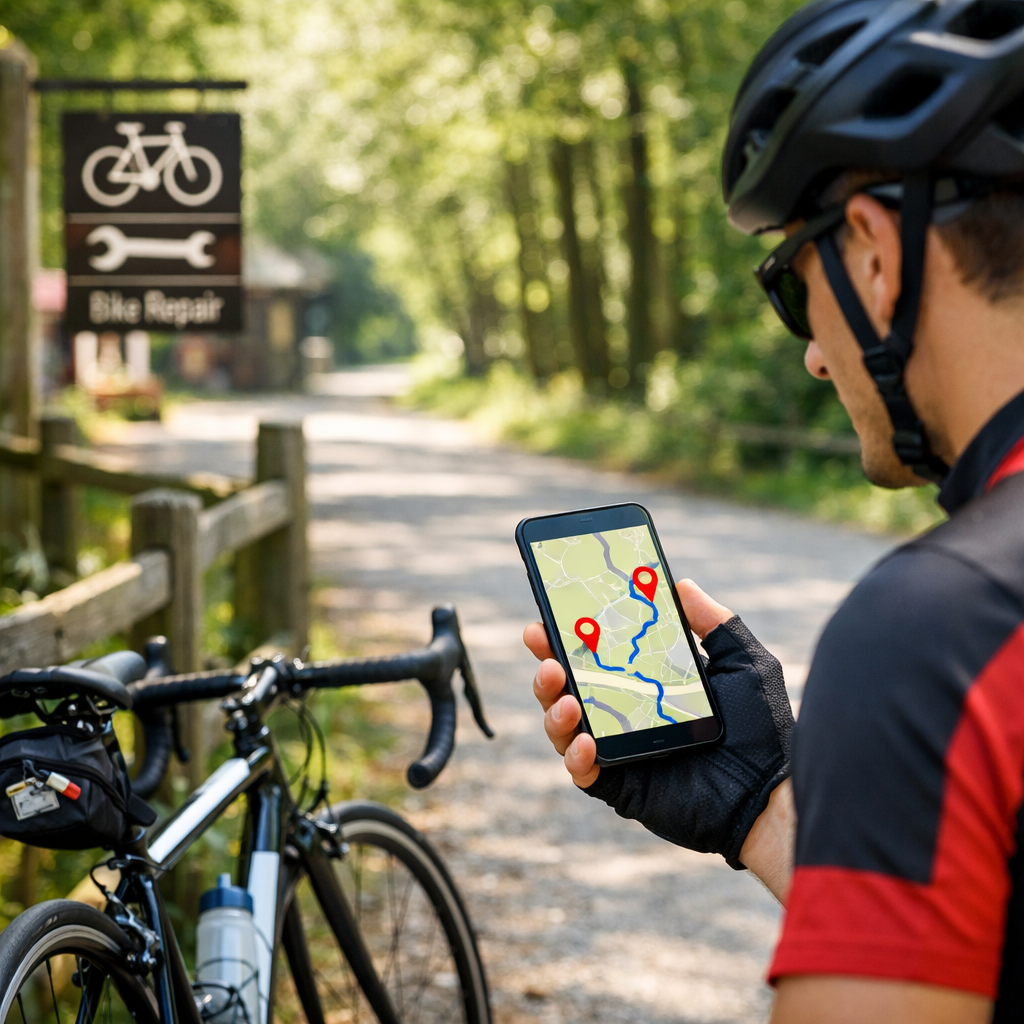
Step 4: Add repair shops and work-stands as waypoints
- Place bike shops, public work-stands, or bike rooms as waypoints every 10–30 km depending on terrain and your self-repair comfort. Tighten spacing on rough gravel or if you’re new to roadside fixes.
- Waypoint definition (40–50 words): A waypoint is a pinned location—such as a repair shop, pump, water source, or transit stop—embedded in your route. Your navigation will guide you to it. Waypoints anchor services at predictable intervals, improving pace management, morale, and rescue options if a mechanical occurs off-schedule.
- Note shop types and expectations: multi-location dealerships may stock more SKUs and offer quicker turnarounds; smaller mom-and-pop shops vary by mechanic depth. Experience matters—5+ years often yields faster, more reliable repairs [2]. Always note hours and potential for same-day service.
Step 5: Verify shop details and gather local intel
- Call shops ahead to confirm hours, tube/tire sizes, brake pad types, turnaround time, and whether public pumps or a repair stand are available.
- Ask around: chat with shop staff and local riders for detours, closures, or safer cut-throughs, then corroborate what you hear with multiple map sources or user reports before trusting it [5].
- Check community libraries, cycling heatmaps (for example, Strava’s aggregate patterns), and curated route databases to confirm popularity and to avoid busy arterials when a quieter parallel exists [7].
Step 6: Export, sync, and download offline maps
- Export GPX and sync to your Garmin, Wahoo, or Hammerhead. Ride with GPS supports offline maps, turn-by-turn, elevation profiles, cue sheets, and device sync (CyclingNews overview; Ride with GPS feature docs) [7][8].
- Download offline map tiles for your primary corridor, alternates, and bailout connectors. Confirm voice prompts, rerouting, and search all work in airplane mode before departure.
- Offline maps definition (40–50 words): Offline maps are downloaded map data stored on your device so routing and navigation continue without cell coverage. With offline tiles, you retain turn-by-turn directions, service waypoints, and elevation profiles, allowing you to follow your plan and reach repair stops even if the signal drops.
Step 7: Add alternates and bailout options
- Create labeled alternates (ALT-A, ALT-B) around high-risk segments such as construction zones, unpaved climbs, or narrow bridges. Where your app supports it, enable route alternatives to compare safety and flow in context [6].
- Plan multimodal bailouts—bus, train, ferry—and check bike carriage rules with local transit agencies before riding [1].
- Add the nearest transit stops and “shortest-to-help” connectors as waypoints, and include them in your offline downloads so you can pivot mid-ride without signal.
Step 8: Ride with redundancy and safety checks
- Share your route and ETA with a contact. Carry a minimal repair kit, small first aid, ID, cash/card, and preload emergency numbers.
- Use turn-by-turn navigation and offline maps to avoid getting lost. Ride with GPS explicitly supports reliable offline navigation for this scenario [8].
- Consider time-dependent safety: the same corridor can ride very differently at 2 pm versus 5 pm. If your app offers dynamic safety or time-of-day heuristics, set departure windows accordingly [6].
Gear checklist for self-reliance between stops
- Tools: spare tube(s) or tubeless plugs, tire levers, mini-pump or CO2, multitool with chain breaker, quick link, small tape and zip ties.
- Spares/consumables: patches, spare valve cores, a set of brake pads if your model is uncommon, a small bottle of sealant, cash/card.
- Tip: Many public bike rooms include a repair stand and pump—use them when available to save time and keep your hands free for adjustments [3].
Navigation tips for phones and bike computers
- Build routes in a cycling-specific planner, then sync to your device and verify cues and off-course alerts before you roll [5].
- Phones: download offline tiles, disable battery optimizations for the nav app, and carry a compact power bank. Bike computers: preload maps, cuesheets, and alternates; test reroutes in airplane mode.
- Apple Maps now offers turn-by-turn bike navigation and an Avoid Busy Roads option in supported regions; confirm local infrastructure coverage before relying on it [1].
Common mistakes and how to avoid them
- Trusting generic maps that miss protected lanes or surface quality. Cross-check with cycling planners that expose bike infrastructure and safety filters [1].
- Not verifying shop hours or services. Call ahead, note turnaround times, and add an after-hours public work-stand near your midpoint.
- Skipping offline maps. Ensure routes and tiles are synced for no-signal navigation [8]. Corroborate route details across more than one source before you trust them [5].
Frequently asked questions
How far apart should I place repair shop stops on my route
Hiking Manual generally recommends spacing repair shop or work-stand waypoints every 10–30 km based on terrain, traffic, and your repair confidence. Tighten spacing on rough surfaces or while you’re still building DIY skills.
What tools should I still carry if I plan around shops
Hiking Manual’s baseline kit is a flat kit (tube or plugs, levers, pump/CO2), a multitool with chain breaker, and a quick link. These light basics resolve most mid-ride issues between service points.
How do I plan for areas with few or no bike shops
Hiking Manual suggests adding public repair stands or bike rooms, preloading clearly marked alternates, and planning multimodal bailouts on transit that allows bikes. Improve self-reliance by practicing flats and basic adjustments and by downloading offline maps.
What if a shop is closed when I arrive
Hiking Manual advises marking backup shops and after-hours repair stands and carrying essentials for common fixes. Include alternates to reach open services or a transit bailout if a closure derails the plan.
How can I adapt a route mid-ride without cell service
Use a planner and device that support offline maps and turn-by-turn. Hiking Manual recommends syncing alternates and waypoints ahead of time so you can switch routes in airplane mode.